Change properties for annotations using either custom selection, where you click a few annotations from a particular group or multiple groups, or using bulk selection, where you select all of the annotations, all of the annotations in a group or multiple groups. Bulk selection is depicted below. With bulk select, annotations that fall outside of the current map view are also selected.
Once selected, actions such as cutting and pasting, and modified display properties are applied to all selected annotations. These operations can be undone and also reapplied using the Undo ( ) and Redo (
 ) buttons that appear in the top-left of the application window.
Display properties for annotations added to User Layers can also be changed. Because User Layers, unlike other map layers, aren't dependent on any map, but are available to all maps, display changes to User Layers are replicated across all maps in which that user layer is displayed.
Annotations are differentiated by type (point, line, region) so that the order in which they're drawn can be first regions and circles, lines, text, and then points. In this way, filled regions don't obscure lines and lines don't obscure points.
 ).
).If working with annotations on a User Layer, that layer must be both selected in the Layer Legend (so that its annotations are visible), and displayed as the current layer in the Layer drop-down list in the Annotation ribbon toolbar (so that its annotations are selectable). Below, a User Layer is being selected from the Layer drop-down list.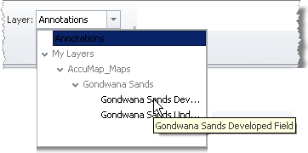
) option, choose either All Annotations, or one or more annotation groups. This option also selects annotations that fall outside of the current map view.The selected annotations show node selection handles to confirm they're selected. Below, a triangle and a circle show node selection handles.
 ).
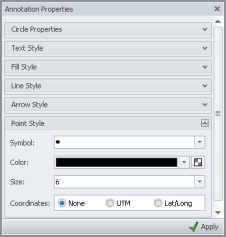
).The Annotation Properties dialog box appears. The panes displayed in the Annotation Properties dialog box depend on the annotation types selected on the map. For example, if both a point annotation and a line annotation are selected, the Line Style, Arrow Style, and the Point Style panes appear in the Annotation Properties dialog box.
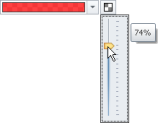
 , and then drag the slider as depicted.