 ) is selected in the ribbon in the Print tab.
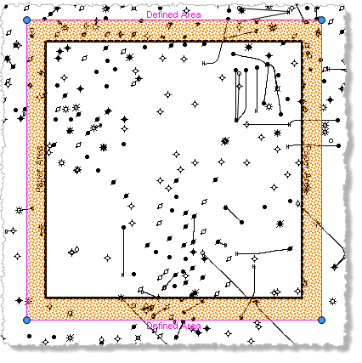
There are three steps to printing maps:
Jobs can be printed to PDF or to image format (.bmp, .gif, .jpg, .png, .tiff, .emf, and .wmf) and included in other documents or presentations. If printing to PDF, map layers with fills (Land, Fields, Pools, and Units, etc.) that have transparency enabled cause large PDF files to be created, which Acrobat Reader is unable to launch. Disable transparency by either selecting a solid fill or no fill for the above layers.
Changes you make to the print layout are retained for future AccuMap sessions. You can also the configuration as a template that you apply to any map.
An outline showing the default Defined Area and the Paper Area appears on the map (Print Area bounded by black line, Defined Area bounded by pink line). By default, the Defined Area and the Paper Area are the same size and are roughly half the size of the map window, but you can drag a line of either to change this providing the Lock Defined Area to Paper Area check box is cleared and Edit mode () is selected in the ribbon in the Print tab.
 ) and using the Print dialog box, select the desired printer and then click Preferences to set hardware print options. The settings from which you can choose using the resulting Printing Preferences dialog box are based on the particular printer and are not covered here.
 ) to select from four basic settings or to click Custom below the standard settings to display the Page Setup dialog box where you specify custom margins and paper sizes, Orientation (
 ) to select either Portrait for vertical length or Layout for horizontal length, and Size (
 ) to select standard paper sizes. These same paper sizes are available from the Margins option above when you click Custom to display the Page Setup dialog box.
 ). Edit - to drag the Defined Area (and accompanying Paper Area) so that it covers the general area to print. Drag the Defined Area to more accurately select the specific map area to print. By default, the Defined Area fills the Paper Area, but you can drag it smaller to increase the margins. When the Defined Area is smaller or larger than the Paper Area, the Fit Defined Area to Paper Area (
 ) option becomes active, which you click to match the Defined Area extents to the Paper Area. Lock Defined Area to Paper Area which fills the paper area with the defined area changing the scale as required.
 - to move the current map so that the Defined Area appears in the center of the map. This is handy when you've panned away from the Defined Area and want to move back to it.
 - to place the Defined Area in the center of the current map extents. This is handy when you want to use the current map, but don't want to have drag the Defined Area box to it.
 ) to save the current configuration as a template that controls the presentation of printed maps.) - Display the Print Preview dialog box based on the current map using the map center point and the Scale 1: defined in the bottom-right of the map window. Using the Print Preview option, click Apply Template (
 ) to apply a configuration template that you previously saved to the current map. You can use this template as is, or modify it further and then save it as well as a print map configuration template.) to select from four basic settings or to click Custom below the standard settings to display the Page Setup dialog box where you specify custom margins and paper sizes, Orientation () to select either Portrait for vertical length or Layout for horizontal length, and Size () to select standard paper sizes. These same paper sizes are available from the Margins option above when you click Custom to display the Page Setup dialog box.
The Print Preview dialog box appears..png)
 ) and using the Print dialog box, select the desired printer and then click Preferences to set hardware print options. The settings from which you can choose using the resulting Printing Preferences dialog box are based on the particular printer and are not covered here.
 ), or zoom in (
 ) or out (
 ) where each click halves or doubles your current map scale
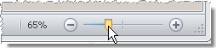
 ) and then either Default to select the most common printed map elements, or click Map or Legend and then select other elements that you may want to print . To position or resize items on the printed page by dragging them in the preview pane, click Edit Mode (
 ). The Layout and whether edit mode is enabled appears in the bottom-right of the Print Preview dialog box.
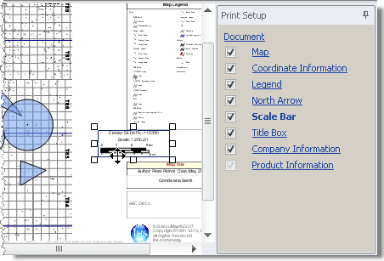
The lower portion of the Print Setup pane displays controls to modify the map element. The type of display controls displayed depend on the map object selected. For example, click Map to set whether the map background is transparent. Click Company Information to import an image of the corporate logo.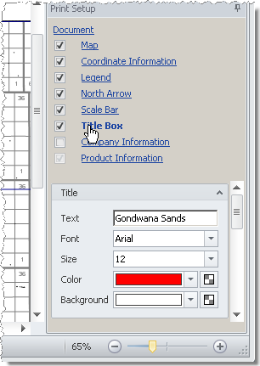
Configure the desired display options. For Color, click the drop-down list and select either the Palette or Named tab and click the desired color. To change the opacity, click  , and then drag the slider as depicted.
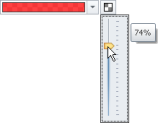
) to save the current configuration as a template that controls the presentation of printed maps.