
You can have one or many Tops Sources, and in each you can store user tops for any set of wells you choose. All user tops are stored in a single database file called Tops.userdb. The location of the user tops database file is specified in the File > Settings > Folders menu option.
This database may contain several different sets of tops for any given well, stored in different tops sources. You can import and create as many sets of tops (and associated attributes) for a well as you like. The tops and attributes are written to a tops source you specify. A tops source is simply a collection of user tops for certain wells.
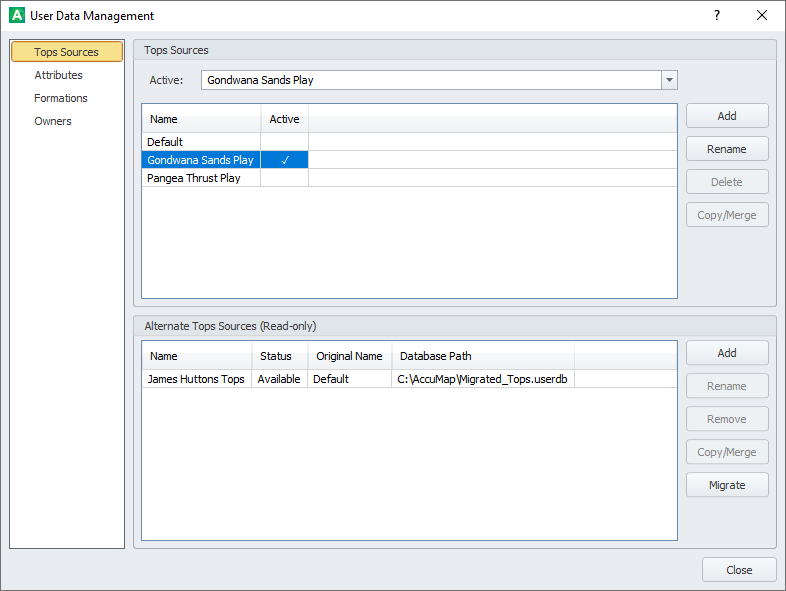
The User Data Management dialog box is a central location from which you manage all settings and details of your user tops sources, formations, attributes, and owners.
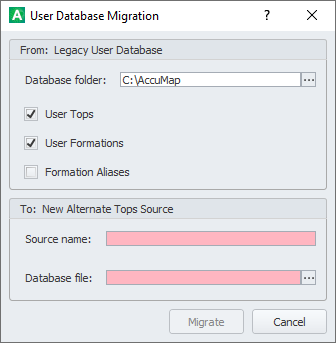
Transfer a database of user tops into a new Alternate Tops source. This could be either your own legacy database of user tops, or another AccuMap users database of user tops that you want to review. If AccuMap detects that you haven't migrated your original database of user tops already, a Migrate button appears in the Tops Sources pane that you click to complete the initial migration.
Using the Migrate button that appears in the Alternate Tops Sources pane, specify whether to migrate tops, formations, and aliases into the new alternate tops source.
AccuMap supports multiple tops sources and stores them in a single file called Tops.userdb. To determine the location of your Tops.userdb file, refer to the Application Settings: Folders User Database Folder setting.
While multiple user tops sources are supported, only one can be the active tops source at a single time. All tops sources are readable, but only the active tops source can be written to (edited).
AccuMap also supports alternate tops sources. These are tops sources that originate from someone else's Tops.userdb file. These tops sources are always read-only as you cannot make an alternate tops source the active tops source.
To save tops to different source, click Add to create a new, empty tops source, and make it Active to save new tops in it, or to Copy/Merge to it.
Alternate Tops Sources are other tops user databases to which you have read-only access. Alternate Tops Sources differ from Tops Sources defined above in that they are a separate file, not a location within the master user tops database file, and are read-only.
Both Tops Sources and Alternate Sources can be displayed throughout AccuMap in dialog boxes such as the DataCard, Contouring, and more.
Restrict the copy/merge process to the well by specifying either a cross section or a well list that contains the UWIs for which to copy/merge tops. Restrict copy/merge to a specific formation or group of contiguous formations by specifying a zone of interest.
There are five copy/merge options with increasing severity. Below is a simple example that shows how each of the options affects your Active user tops source:
| Add Tops
Tops are placed only in wells without any picked tops, so in the example below, no tops are copy/merged. 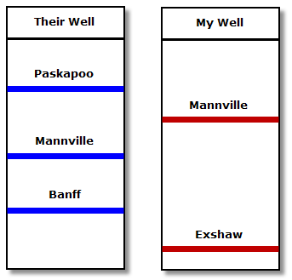 |
Insert Tops
Tops are placed in wells providing they're not already picked. In the example below, Mannville isn't copy/merged. When no tops are picked in the destination well, but they are in the source well, the source well KB is copied to the destination well along with the tops.  |
| Replace Attributes
For wells in which the source has tops picked, your existing attributes are deleted and all source tops attributes are added. In the example below, only Exshaw attributes are preserved.  |
Replace Tops
Tops are placed in all wells, either by insertion when they're not yet picked, or by overwriting when they are. In the example below, only Exshaw is preserved. |
| Delete Tops
For wells in which the source has tops picked, your existing tops are deleted and all source tops are added. In the example below, Paskapoo and Banff are inserted, Mannville is replaced, and Exshaw is deleted.  |
When using either the insert or the replace options, and a well in either the tops source or in the active user tops source has more than one instance of the same top in a well, that top is not written to your wells.
With Tops Sources selected in the navigation pane of the User Data Management dialog box, and a tops source selected that is not presently the active tops source, click Copy/Merge to display the Copy Merge to Active Tops Source dialog box.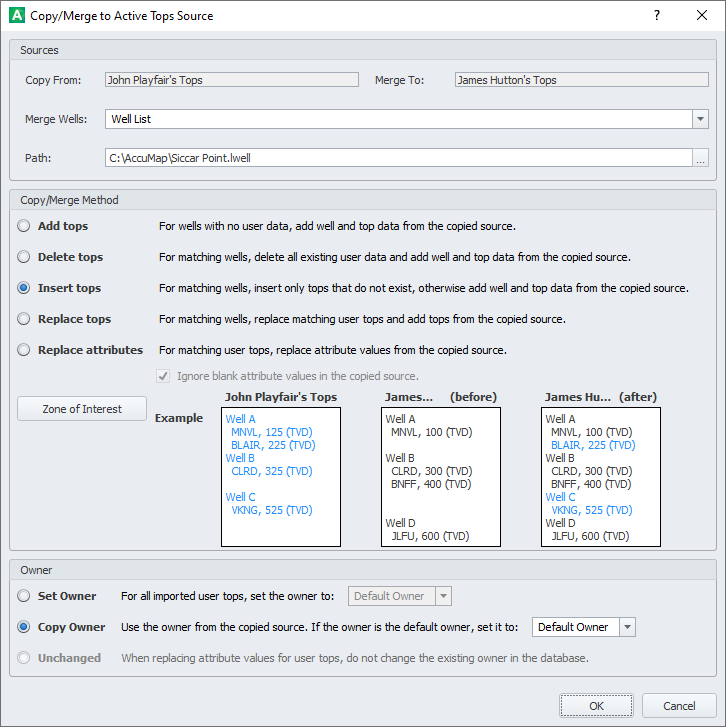
Depending on the copy/merge options above, UWIs of wells with added or deleted tops and wells to which tops couldn't be added (likely because of duplicate tops in the same well) appear in the display pane above.
The following attributes are included by default, though you can add as many attributes as you like: Comment; Net Pay; Net Sand; Permeability; Water Saturation; Porosity Percent. The default attributes cannot be deleted or renamed, but you can change whether they appear as a column or a row in the tops data grid for user tops.
To search the list of attributes that appear in both the Column and Row Attributes grids, start typing the attribute name in the Search box, which appears at the top of the User Data Management dialog box. To sort the grid, click a column header. Drag the column border ( ) to change the column width.
With Attributes selected in the User Data Management navigation pane, click Create to the right of either the Column or Row Attributes grids to display the Create Attribute dialog box, where you define a unique attribute name, type, display (row or column) and a brief description for the desired attribute. UWI, KB, Formation, and Owner cannot be specified as attribute names.
When you click OK, the new attribute appears in either the Column or Row Attributes grids, depending on which you specified in the Display drop-down list, and values can be assigned to it using the DataCard: Tops tab.
By default, attributes specified for column display automatically appear in the DataCard: Tops grid, whereas attributes specified for row display must be added to each individual formation top by clicking the twisty to the left of the formation name to reveal the + sign, and then clicking the + sign to display the Add Attribute dialog box where you select the desired attribute to add.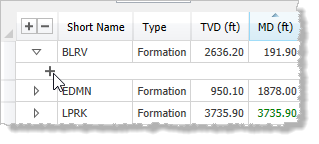
Twisties for which an attribute is added are colored black ( ). Twisties for which attributes are not added remain transparent (
![]() ).
).
Select the attribute in the grid, and click Edit or Delete to the right of the grid to modify or delete a selected attribute.
As with the User Formations dialog box, search the User or System Tops database based on type (Formation, Contact, Accessory, etc.). For items from the user database, spawn, modify, or delete. Text boxes are colored pink where the text is not unique and the item thus cannot be saved. Only a single item at a time can be deleted.
Click column headers in the grid to sort the results.
With Owners selected in the navigation pane of the User Data Management dialog box, click Add to display the Add Owner dialog box, where you type the name for a new owner. Click Rename to change the name of a selected owner.