Merging LAS Files
Merge the curves in the current LAS file with the curves in another LAS file. LAS tools provides a merge instruction pane called Resultant Curve Operations where impending merge operations are listed for your review. Delete instructions in this pane to prevent an action from occurring.
LAS tools verifies the depth units, sampling rates, depth reference values, and depth sampling directions before merging and updates discrepancies found using the preferences you've set.
Click the Merge Preview tab to review a graphical depiction of the merge operation that will occur.
LAS tools pro automatically verifies key data elements in each file such as depth units, sampling rates, depth reference values and depth sampling directions before merging the files and normalizes the data based on your preferences.
To merge LAS files
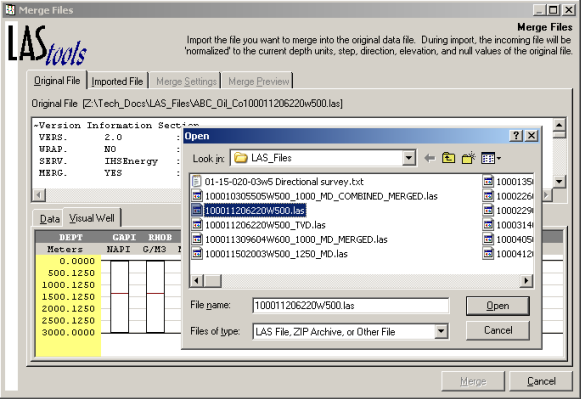
- With one of the LAS files to merge displayed in LAS tools, from the File menu, select Merge Files (
 ).
).

Both the Merge Files and an Open dialog box appear.
If you want to review the existing LAS file before selecting a file to merge, using the Open dialog box, click Cancel and then review the Original File: Data and Original File: Visual Well tabs. To resume importing the merge file, using the Merge Files dialog box, click the Imported File tab and click Open in the top-left of the dialog box.
- Using the Open dialog box, browse to the LAS file to merge with the existing LAS file already in LAS tools, and then click Open.
A well elevation correction dialog box may appear depending on whether the files to merge have different elevations.
Click whether to apply a well elevation correction to the imported file.
The Merge Files dialog box appears.
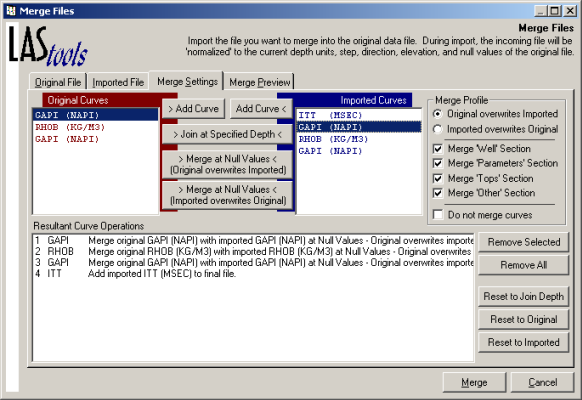
- Click the Merge Settings tab.
- Review the Resultant Curve Operations pane at the bottom of the dialog box to determine what merge operations will occur.
As you select merge options, a text description of the merge option appears in the Resultant Curve Operations pane and a graphical depiction of what will occur appears in the Merge Preview tab. Select an instruction (CTRL+Click or SHIFT+Click for multiple selection) in the pane and click Remove Selected to prevent it from occurring. The related graphic depiction is also removed from the Merge Preview tab.
- Select a curve in the Original Curves pane and a curve to merge with it in the Imported Curves pane, and then select from the following options:
Add Curve - Depending on whether you click the button on the left or right, either the original curve is kept or the imported curve is kept.
Join at Specified Depth - Click to display the Set Join Depth for Merge dialog box where you select the depth at which to join the two curves (see below).
Merge at Null Values - Click whether null values in either the original or imported curve are replaced by values from the other.
To undo any of the merge settings you may have changed back to their default state, to the right of the Resultant Curve Operations pane, click either Reset to Join Depth (see process below), Reset to Original, or Reset to Imported.
- Click Merge.
Join at Specified Depth
Click Join at Specified Depth.
The Set Join Depth for Merge dialog box appears.
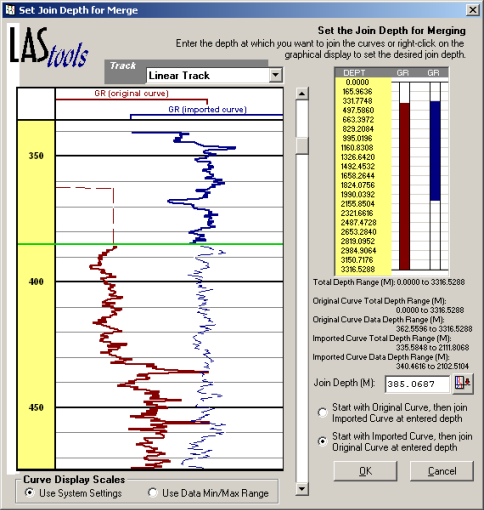
Do either of the following to specify the merge depth:
Right-click the left pane at the depth from which to start merging, and from the shortcut menu, select Merge.
Type a depth in the Join Depth box, and then click  .
.
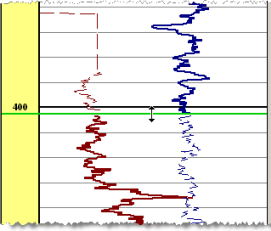
A green horizontal line marks the point below which the merge will occur and the line style for portions of each curve that will be removed appear thinned and dashed.
Drag the green horizontal line up or down to change the location at which the merge starts as depicted below.
Click OK to save the merge settings for this curve pair and to return to the Merge Files dialog box.

IHS Markit™