Performing APE in Advanced Analytical Models
Related Topic:
Automatic Parameter Estimation
APE is used to assist with history matching (link to history matching). The steps to do this are:
1. Specify the data points to be used.
2. Specify the parameters to vary.
3. Run APE.
| Note: | Automatic parameter estimation (APE) is not available for numerical models. |
Specify Data Points to be Used by APE
By default, all data points are selected for use by APE.
Deselecting Points
If your data has some outliers, or some periods of unreliable data, you can deselect these points. To specify data points to be ignored by APE:
1. On the toolbar of any plot within the Plots sub-tab of an advanced analytical model, click the Display a toolbar with options to select data points icon, and select the Select Points option from the sub-toolbar.

2. Right-click and drag your mouse over the data on plot. (Clicking-and-dragging reselects any deselected data.)
Weighting Points
You may want to weight some data points more heavily than others when performing APE. For example, when analyzing buildup data to get an estimate of average reservoir pressure, it is more important to match the data at the end of the buildup, than the start of the buildup. Similarly, if a wellbore effect is observed, you may want to ignore those points when history matching.
APE tries to minimize the error between the synthetic (model) pressures and the measured pressures. The error terms for weighted points are amplified in the convergence algorithm. In other words, APE tries really hard to converge on weighted points, less hard on converging points without weighting, and ignores deselected points.
To weight points:
1. Click the Weight Data Points icon on the history plot toolbar.
![]()
2. Move the mouse over the pressure data on the history plot. The cursor changes to a spray can.
3. Click-and-drag the cursor to spray the points you would like to add weighting to. Right-click and drag to remove weighting from weighted points.
Specify Parameters to Vary
To specify which parameters to vary:
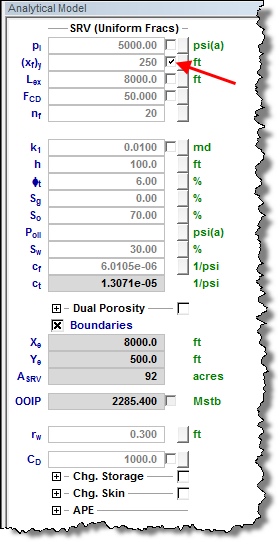
1. In the Analytical Model pane, select the parameters you'd like to vary by clicking the Automatically calculate variable checkbox to the right of the parameter's field.
2. To vary a certain parameter within given limits, click the View Defaults and Limits button to the right of the field. Enter the appropriate values, and then click the Accept button.

Run APE
To run APE:
In the model's toolbar, click the APE icon to start the APE process.
![]()
WellTest adjusts the parameters in order to improve the history match between the simulated and measured pressures on the data plot. The process stops automatically, or if you want to stop it manually, click the APE icon again.
After you have achieved your desired result in CalcP mode ![]() (calculates sandface flowing pressure based on measured rate), we recommend that you switch to CalcR mode
(calculates sandface flowing pressure based on measured rate), we recommend that you switch to CalcR mode ![]() (calculates the rate based on given sandface flowing pressures), and verify if the calculated rate matches the actual rate. If these rates are not close, additional history matching should be done.
(calculates the rate based on given sandface flowing pressures), and verify if the calculated rate matches the actual rate. If these rates are not close, additional history matching should be done.
| Note: | If an acceptable match is not obtained, you can manually adjust the parameters and repeat the APE process, or consider a different analytical model. |