 To print maps
When working in AccuX DB Mode, what's printed is controlled both by your current screen extents and whether you fit them to the page size defined for your printer. In Project Mode you define the extents to print using a print rectangle instead.
You can either print maps, or copy them to your clipboard and paste them into other applications. Before printing, toggle whether to display only the current cross section line, all cross section lines within the current map extents, or no cross sections lines.
To print maps
1. From the Map
menu, select Map Output Prep
> Map Print Options.
OR
From the File menu, select Print/Copy Setup (Map).
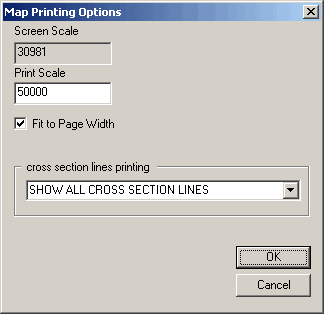
The Map Printing Options
dialog box appears.
2. Do any of the following:
![]() Type a specific print scale, for example type the same scale at which
other material to which you're comparing the map is printed.
Type a specific print scale, for example type the same scale at which
other material to which you're comparing the map is printed.
![]() Select whether to fit the map to a specific page size and define that
page size for your printer by selecting File
> Print Setup
> Properties.
Select whether to fit the map to a specific page size and define that
page size for your printer by selecting File
> Print Setup
> Properties.
![]() From the Cross Section Lines Printing drop-down list, select whether to
print the current cross section line, all cross section lines within the
screen extents, or no cross section lines.
From the Cross Section Lines Printing drop-down list, select whether to
print the current cross section line, all cross section lines within the
screen extents, or no cross section lines.
3. Click OK.
4. From the Map menu, select Map Output Prep > Map Title.
The Map
Title Information dialog box appears.

5. Type the desired map title information and then click OK.
6. From the File menu, select either Print Preview to verify how your printed map will look, or select Print and then click OK.
 Note: Ensure your
print options are set so the map is processed by your computer and not
the printer or print server.
Note: Ensure your
print options are set so the map is processed by your computer and not
the printer or print server.
![]() To
copy the map to another application, from the Map menu, select
Copy Entire Map.
To
copy the map to another application, from the Map menu, select
Copy Entire Map.
Note: To maintain the quality of AccuX objects
you paste into other applications, in those applications, select Edit
> Paste Special > Enhanced
Metafile (EMF)
format
