EDIN Desktop uses both spatial and relational data. Spatial data is the geographic information that appears on EDIN Desktop maps. Relational data is the underlying data linked to spatial data.
Relational and spatial data with matching version and date information are referenced using a single, uniquely named data set that you create. Along with relational and spatial sources, data sets also include a file that specifies a root directory within which subdirectories with well and land images, and basin monitor PDFs are saved. Proprietary data isn't associated with a particular data set.
Although only one data set can be active at a time, it's a good idea to have two separate data sets, each pointing to different data sources. Users stay connected to the current data set while you update the inactive data set, test it, and then change it to the active data set. This way, if there's a problem, you can easily revert to the previous data set.
Either create a brand new data set, or replace the data currently associated with a data set. The following procedure enables you to do either.
To create or edit a data set
1. In the Admin Console navigation tree, click Manage Data Sources. For network application installs, the Manage Data Sources option appears under the Advanced node.
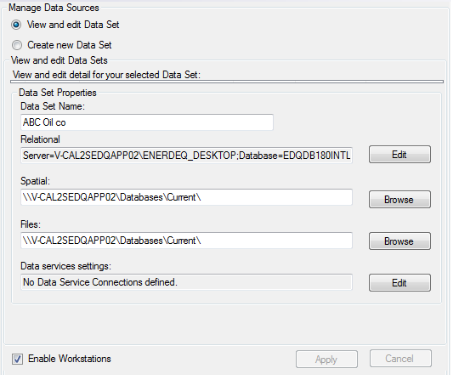
The Manage Data Sources: View and edit Data Set dialog box appears.
First you review the existing data set details.
2. Ensure the View and edit Data Set radio button is selected at the top of the screen.
Select the existing active data set in the View and edit detail... pane, and then review the Data Set Properties pane to determine the paths to the active spatial and relational data sources (and the root directory of well and land images, and basin monitor PDFs). Point to different data sources with the data set you're about to create.
Next you create the new data set.
3. At the top of the pane, click either the Create new Data Set, or the View and edit Data Set radio button, depending on whether you want to create a new data set or modify an existing one.
The Manage Data Sources: Create new Data Set dialog box appears.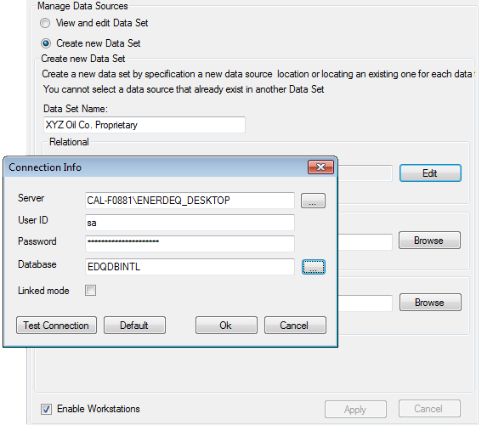
4. Type a unique name for the data set, and then using the EDIN Relational box, click Edit and populate the Server, credentials, database, and whether to run in Linked mode for the database, and then click OK.
5. Beside the Spatial box, click Browse and navigate to the location where spatial data is located.
The same relational or spatial data source shouldn't be referenced by two different data sets.
Beside the Files box, click Browse and navigate to the root location in which files and subdirectories that contain well and land images, and basin monitor PDFs are located.
You must have write access to the location where to install EDIN data.
SQL Server must already be installed on the machine where you're loading relational data and the path you specify must be local to that machine (C:\New_Relational_Database). SQL Server doesn't need to be installed on the same machine where the spatial data is loaded, but the location you specify must be shared as either a mapped drive, or identified in uniform naming convention (UNC) format (\\Spatial_Data_Server\Spatial_Data).
6. Click Apply.
Next you install the data.
7. In the Admin Console navigation tree, click Data Installation and Update.
The Data Installation and Update dialog box appears.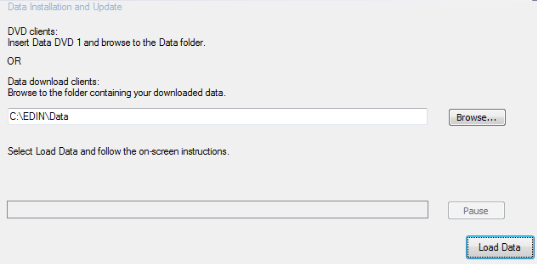
8. Browse to the data installation DVD you received from IHS, and then click Load Data.
Next you make the data visible to EDIN Desktop users.
9. In the Admin Console navigation tree, click Manage Data Sources. For network application installs, the Manage Data Sources option appears under the Advanced node.
The Manage Data Sources: View and edit Data Set dialog box appears.
10. In the top of the screen click View and edit Data Set, and then using the View and edit details... pane, select the radio button in the Use in EDIN column for the data set you created above.
Admin Console prevents you from enabling a data set that's incompatible with the current EDIN Desktop schema. The following symbol appears to the left of the data set in the View and edit Data Sets pane:  . Hover your cursor over it for a description of the error and some possible resolutions. In most cases data issues are either caused connectivity (server access, password validity) or data format. Data format can usually be resolved by re-loading the data.
Delete a data set providing it's not currently being used by an EDIN Desktop user. Admin Console even allows you to delete the last remaining data set if Enable Workstations is cleared.
Before deleting any data sets remember that it's a good idea to keep the previous data set just in case you need to revert to the previous one.
When you delete a data set, the data source with which it's associated is also deleted.
| Loading incremental updates | Monitoring EDIN Desktop usage |