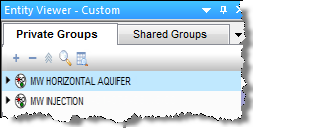
The Entity Viewer - Custom displays private groups and shared groups. You can create custom groups from your list of wells in the hierarchy based on locations and groupings that are not possible within the hierarchy structure.
| Note: | Property correlations and the gas type are initialized for a group based on the values you have specified for its constituent wells. If these settings are not identical for all the wells in the group, Harmony Enterprise uses the default values. |

If you import custom groups, they are shared, and each custom group is guaranteed a unique name. Note that custom groups are not imported when their ID already exists.
Clicking an entity in this pane highlights the entity in the GIS map and displays the entity's data under the other tabbed headings. (Only well and meter station entities are shown on the GIS map, and only if they have valid location information entered in their attributes.)
You can scroll through wells using your keyboard's arrow keys by doing the following: click the tab you want to view (for example, Analysis or Diagnostics), click a well in the Entity Viewer, and then press the Up and Down arrow keys on your keyboard.
You can select multiple entities by clicking wells while holding down the Ctrl key (to make individual selections), or the Shift key (to make group selections).
Toolbar
The Entity Viewer - Custom has the following important icons:
-
 Add Entity — create an empty custom group or create a group from entities you have selected.
 -
 Remove Selected Entities — select an entity or group in the tree structure and then click this icon to remove it. Note that if you delete an entity in a custom group, it is removed from the group, but it still exists in the project.
 -
 Search — opens a search box where you can search for entities by name. (You can also initiate a search by pressing Ctrl + F.)
 -
 Query — opens the Query Wells dialog box where you can query and filter wells using attribute data.
For a description of common icons, see pane toolbars.
Note that if you selected a previously created filter (see project filters) prior to creating a new custom group, this custom group automatically exists in the filter.
Private groups tab
On this tab, you can view groups that only you can see.
These entities are user-specific and are not accessible by others unless you right-click a custom group and select Share Group. This moves the custom group to the Shared Groups tab.
Shared groups tab
On this tab, you can view groups and wells that are shared with users who have access to the database.
Work status icons
The Entity Viewer panes use icons to indicate the work status of entities. The icons and their meanings are as follows:
 (Complete) — an analysis has been completed
for this entity.
 (In Progress) — this entity has been selected,
and an analysis has been started, but it has not yet been completed.
 (Invalid) — data for this entity has changed,
or wells within this group have changed. If an analysis has been run,
it may no longer be valid.
You can set your work status manually by right-clicking the entity and selecting Set Entity Work Status. To reset your work status, right-click and select Clear Status.
Context menu
Right-clicking within this pane lists various options, which depend on the type of entity you select (for example, a well, group, or multiple wells).
- Rename — renames the entity.
- Remove Selected Entities — removes the selected entities from the custom group, but retains the entities in the database.
- Rerun Well Query — (visible after you have run a well query): if you have modified wells in your database, running the query again updates your results.
- Select Constituent Wells — (for groups): selects all of the wells that belong to the group. (This selection is applied to the Entity Viewer - Hierarchy as well.)
- Set Entity Work Status — changes the work status icon for the selected entity.
- Apply Workflow to Selected Entities — applies your workflow to the entities you selected. For more information, see apply a workflow.
- Move Selected into Custom Group — moves the selected entities into a custom group.
- Duplicate Selected into Custom Group — copies the selected entities into the custom group you select from the submenu.