With Harmony Enterprise, you can import plain-content files, such as .csv, .txt, and .xlsx, along with the following file types:
| File Type | File Extension | Sources |
|---|---|---|
| Merak
Note that you can import injection tubing pressure and it is displayed as Tubing Pressure in the Production editor. |
.mer | Geoscout |
| Dwight dmp2 | .dp2, .dmp2 | IHS Markit |
| Value Navigator (ValNav) | .vna | Accumap
(IHS Markit Accumap can save files in a ValNav format. Note that Harmony Enterprise cannot import .xml files from ValNav.) |
| Lasser Data | .prn | Lasser Data |
| Aries | .axp | Aries (IHS Markit Accumap can save files in an Aries format.) |
| Geo Webworks | .mxp | Geo Webworks |
| 298 98c | .98c | IHS Markit |
| Recorder | .rec |
Plain-content files
When you import plain-content files, you need to select one of Production, Attributes, or Static Pressure; you cannot import more than one at the same time.
To import well data from plain-content files (for example, .csv, .txt, .xls, etc.):
1. Click the Import icon (![]() ) in the main toolbar and select File.
) in the main toolbar and select File.
Or, you can click the Import menu and select File.
2. Browse to your file and click Open.
3. In the Import Data Type dialog box, select Production, Attributes, or Static Pressure.
Note: If you are importing data from the Production editor, production data is imported, and the Import Data dialog box opens after you click Open in step 2. Note that it is not possible to save an import template.
4. In the Import Data dialog box, assign column headers by clicking the drop-down arrows at the top of each column.
- You must assign a Time and Date Time column (when using Production data), and a Well Identifier and a second column (when using Attribute data).
- If you select Production and a column is mapped to Well Identifier, Harmony Enterprise uses the name from the well identifier. This enables you to import one table or Excel worksheet containing multiple wells.
- If you are importing from an Excel file (with or without multiple worksheets), Harmony Enterprise uses the worksheet name for the well name. This enables you to import multiple wells by separating them into different worksheets. (You can also use the Apply To button to copy the column mapping to all worksheets.)
- If you are importing from a .csv or .txt file, and there is no column mapped to a well identifier, Harmony Enterprise uses the file name for the well name.
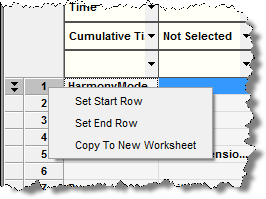
The Import Data utility assigns start and end rows to the dataset. The start row (the first entry populated in Harmony Enterprise's production or attributes table) is indicated by two arrows pointing down in the far left column. The end row (the last entry populated in Harmony Enterprise's production or attributes table) is indicated by two arrows pointing upwards in the far left column.
5. Verify that the correct rows are assigned as the start and end rows, and modify if necessary. To modify a row, right-click the row and select Set Start Row or Set End Row.

6. After you have assigned your column headings, click OK.
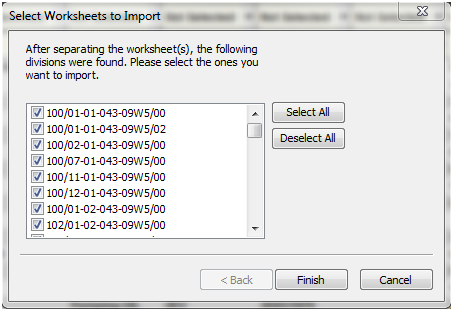
The Select Worksheets to Import dialog box opens.

7. Click the checkboxes for the entities you want to import, and click Finish.
Harmony Enterprise imports the well data. After the import process is complete, the new wells are listed in the Entity Viewer - Hierarchy pane. (If you imported the wells as a group, they are displayed as a new custom group in the Entity Viewer - Custom pane.)
8. Review your merge options in the Confirm Import Merge Options dialog box. To change your settings, click the Options icon (![]() ), which opens the Options dialog box. To proceed without make changes, click OK.
), which opens the Options dialog box. To proceed without make changes, click OK.
Other files
To import well data from the other supported file types:
1. Click the Import icon (![]() ) in the main toolbar and select File.
) in the main toolbar and select File.
Or, you can click the Import menu and select File.
2. Browse to your file and click Open.
Note: The import behavior for an incoming file, which contains well information about wells that are already in the database, is determined by the settings in the Options dialog box, under the Importing node.