Options dialog box
You can access the Options dialog box from the Tools menu, or by clicking the Options icon (![]() ) on the main toolbar.
) on the main toolbar.
Any of the User Settings you change apply after you close the dialog box, and do not affect existing analyses, or other users' analyses. However, Shared Settings are database settings that apply to all entities and other users connected to the database. In some situations, existing analyses are updated as well (for example, BOE and classified consolidations).
Importing
Unreported Volume or Rate
- Leave as Null (empty) — assigns no value to volumes / rates whose true value is not reported.
- Zero — assigns a value of "0" to volumes / rates whose true value is not reported.
- Step Interpolate — carries over the preceding value to an unreported volume. This creates a step-like plot.
- Linearly Interpolate — assigns a value to an unreported volume that is equidistant from the preceding and following reported values. This creates a linear plot.
Number Format
Use Comma as Decimal Separator — applies to some European customers where commas are used as a decimal. If this applies to some of your text imports, click to select this option, so that Harmony Enterprise can appropriately handle the numbers.
Import Batch Size
To prevent out-of-memory errors when importing files, you can set your batch size to a fewer number of wells. The default setting is 250 wells (maximum setting) for each of the file types. After you click OK, your settings persist. You do not need to close your database connection in order for your change to take effect.
Import Logging Detail Level
Enable verbose import logging — creates a detailed log after each import, and lists all of the identifiers of incoming wells and which existing well they have linked to (when applicable).
Updating Data
These settings apply globally unless you specify other options on a per-data-source connection basis in the Import Options dialog box.
- Append from last production date — imports production data from the last production end date.
- Merge (Overwrite duplicate dates) — adds new production data and replaces production data for any dates that exist in the current production history.
- Merge (Do not overwrite duplicate dates) — adds new production data and keeps production data for any dates that exist in the current production history.
- Discard all existing data and replace with incoming data — replaces production data with incoming data.
- New data only — imports new attribute and property data and does not overwrite any data.
- Overwrite / Merge existing data — adds new attributes and properties, and replaces existing values with newly imported ones.
- Ignore incoming data — does not import attribute nor property data.
These settings only apply when you import well data from a database (Aries), or from PowerTools.
- New data only — imports new analyses and does not overwrite any data.
- Overwrite / Merge existing analyses — replaces existing analyses when matched with imported ones, and adds new analyses.
- Ignore incoming data — does not import analyses.
These settings only apply to Enerdeq, IHDC, .harmony, and .hldb imports:
- Append with incoming wellbore data — imports wellbore configurations with dates that occur after the latest configuration for a given well in the Harmony Enterprise project.
- Discard all existing data and replace with incoming data — replaces all existing wellbore configurations. Existing configurations are overwritten and new configurations are added to the well. Configuration dates in Harmony Enterprise that are also not in the source data are removed from the Wellbore editor during the import.
- Note: When importing deviation surveys, be aware that if the incoming deviation survey is empty, the existing deviation survey is not overwritten by an empty one.
- Ignore incoming data — does not import wellbore data.
- New data only — the wellbore configurations associated with dates that do not already exist in the Wellbore editor for the well are imported. If the date already exists with an associated configuration, no data is imported.
If importing from Enerdeq or IHDC, only deviation surveys are imported.
- New data only, Append with incoming wellbore data, and Ignore incoming data Options — no wellbore data is imported, and existing wellbore data is unchanged.
- Discard all existing data and replace with incoming data — only overwrites the deviation survey, unless the incoming deviation survey is empty. Existing deviation surveys are not overwritten by null data.
- New data only — imports static pressure data and does not overwrite any data.
- Discard all existing data and replace with incoming data — imports all new static pressure data and overwrites data with the same dates as those being imported.
Custom Data
- Import New Custom Attributes — if this option is selected, all custom attributes are brought in when importing .hldb or .harmony files. If this option is deselected, values for custom attributes that are already set up in the project are brought in, but no new custom attributes are created on import.
- Import New Custom Datasets — if this option is selected, all custom datasets are brought in when importing .hldb or .harmony files. If this option is deselected, values for custom datasets that are already set up in the project are brought in, but no new custom datasets are created on import.
Autocalc Settings
By default, sandface pressure calculations are calculated after your scenarios are imported because this can be a time-consuming process.
- Do Sandface pressure calculation after importing on wells — if selected, sandface pressure calculations are done after your wells are imported. If deselected, sandface pressure calculations are not done.
- Do Sandface pressure calculation after importing on scenarios — if selected (default setting), sandface pressure calculations are done after your scenarios are imported. If deselected, sandface pressure calculations are not done.
You can select both of these options in which case, sandface calculations are done after both the wells and scenarios are imported. If both options are deselected, sandface calculations are not performed.
Data Reduction
Data Reduction Filter
- Always Display the Data Reduction Dialog — opens the Data Reduction dialog box every time well data is imported into the project.
- Display the Data Reduction Dialog when threshold is reached — opens the Data Reduction dialog box only when an incoming well has more than the specified threshold number of production rows.
- Threshold — the number of rows of production data in a well that causes the Data Reduction dialog box to open.
- Gas Rates — the number below which gas values are treated as shut-in when automatically detecting flowing / shut-in periods in data reduction.
- Liquid Rates — the number below which liquid values are treated as shut-in when automatically detecting flowing / shut-in periods in data reduction.
Data Reduction Filter Defaults
- Arithmetic Filter — the default value for all periods using the arithmetic filter.
- Log Filter — the default value for all periods using the log filter.
Data Reduction Use in Period Defaults
- Flowing Periods — sets flowing period defaults to the filter values specified in the Data Reduction Filter Defaults section.
- Shut-In Periods — sets shut-in period defaults to the filter values specified in the Data Reduction Filter Defaults section.
Well Linking
By selecting from the Import Format drop-down list, you can view the entity header attributes (listed in the Attributes tab) that are used to link incoming data to existing wells. For information on how Harmony Enterprise updates wells and merges incoming well data to existing wells, see well linking logic.
The default Entity Header attributes used for well linking are listed by Import Format type. For each Import Format type, attributes are listed in order of linking priority. Most import formats do not allow you to edit linking criteria. However, you can edit the linking criteria for Harmony files, Database Connections, and Text-type files.
To exclude attributes from the linking process, deselect their checkboxes. To include attributes, select their checkboxes. To change the order of priority, click the attribute you want to change, and then click the Move Up or Move Down buttons. As these changes are saved locally, in order to share your settings, you need to click the Export Criteria button when you are finished with your changes. You can then share the .wlc file with other colleagues.
You can import an .wlc file by clicking the Import Criteria button (similar to sharing a template). To go back to the original settings for the import format you have currently selected, click the Reset to Default button.
Enerdeq / IHDC
These options determine the behavior of the direct connection to IHS Markit.
IHS Enerdeq Direct Connection:
- Save Login Information — saves your username and password, so you can log into Enerdeq USA without manually entering your login credentials.
- Split Enerdeq Wells by Production ID — when importing wells, you can separate wells based on production ID. For example, this may apply when you are importing US data where the production IDs have changed throughout the life of a well. In Harmony Enterprise, there is one well per API, and production history from individual production IDs are aggregated together to make sure that the whole production history is captured.
- Aggregate overlapping data in multiple Production IDs — when an API has multiple production IDs, there can be overlapping production periods between production IDs. Select this option to aggregate production data during periods of overlap. The default Enerdeq import behavior concatenates production data from multiple production IDs, and treats any overlap as duplicate production (duplicate dates are not imported).
Import Oil / Condensate data for Enerdeq and .98c files:
- Import as identified — oil and condensate are imported in the same way as they are identified in the source.
- Import as Oil — condensate is imported as oil unless there is already oil reported in the same period. Oil is still imported as oil.
- Import as Condensate — oil is imported as condensate unless there is already condensate reported in the same period. Condensate is still imported as condensate.
IHS Information Hub Direct Connection (IHDC):
- Save Login Information — saves your username and password, so you can log into IHDC without manually entering your login credentials.
Scenario Wellbore(s)
Wells in .harmony files may have several scenario wellbores in addition to a Physical Wellbore.
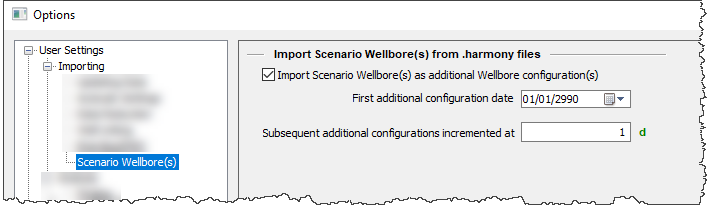
When importing such files to Harmony Enterprise, you can bring Scenario Wellbores as additional wellbore configurations for the well they belong to. Configurations need to have dates assigned to them, so you can set the date for the first additional configuration, and the subsequent configurations are set at the dates that are incremented after this first date.
Note: We recommend assigning Scenario Wellbore dates that are far in the future, so that these additional configurations do not affect wellbore calculations during production history and wellhead forecasts.
Forecast
To automatically add the Add Analysis menu to a new worksheet, click the Worksheet Creation checkbox (default setting).
Decline
These options set the initialization of new decline analyses and constrain the use of best-fit tools:
You can set the parameters that initialize all decline analyses in Harmony Enterprise, and you can change these initialization values while performing an analysis (within the analysis worksheet). The decline parameters and settings are as follows:
- Show results line — displays / hides a green-dashed line at:
i.) the final segment abandonment rate
ii.) the point where a segment transitions from hyperbolic to exponential (if applicable). - b Value (initialization) —
select either Best Fit or Fixed b.
- Min and Max — sets the minimum and maximum b value allowed for the best-fit decline. Harmony Enterprise accepts any value between 0 and 5.
- Enable b value minimization — when you add a decline analysis, Harmony Enterprise automatically selects the best subset of your data for an initial best fit. When this option is selected, the b value (slope) is minimized without sacrificing the quality of the fit. This can be of particular use with unconventional reservoirs where there is more curvature in the declines. (This option is deselected by default.)
- Fixed b — if this option is selected, you must type a b value for every decline to initialize on. (The yellow lock icon defaults to a locked (
 ) position.) Harmony Enterprise accepts any value between 0 and 5.
- d (at Forecast Start Date) — sets an effective decline rate from the forecast start date of a segment, so that each new decline curve initializes with this value. This parameter can be toggled among the effective decline rates (d sec and d tan), or the initial nominal decline rate (a). When the decline is created, whichever of the three parameters displayed is the default rate type displayed in the Analysis Parameters.
- dlim (Minimum / Limiting Decline Rate) — defines a limiting effective decline rate, and every decline switches to an exponential decline (b=0) when this value is reached. The default setting is 8%. This parameter can be toggled from dlim Hyp to dlim Exp. When the decline is created, whichever of the two parameters displayed is the default dlim type shown in the Analysis Parameters.
- Initial Best Fit — select either Autoforecast or Last X% of data points
- Autoforecast — (default setting) an automatic rigorous fit of an Arps’ decline. This initial best fit identifies the partition to fit to, and excludes outliers before fitting the data.
- Last X% of data points — uses the last-specified percentage of the data to initialize the analyses.
- Abandonment Criteria — defines the abandonment rates (qf) for different fluids, or the duration of the decline (Δt) as abandonment criteria.
- Default Calc Method — defines the Calculation Method to be used for the initialization of a decline. The options in the drop-down list depend on whether there is a value for the dlim Hyp or dlim Exp. When there is a value in either of these fields, the drop-down list only contains calculation methods that use dlim. When there are no values in either of these fields, all the calculation methods (including those with dlim) are displayed in the drop-down list.
Probabilistic Decline
These options set the initialization of new probabilistic decline (beta) analyses.
You can set the parameters that initialize all decline analyses in Harmony Enterprise, and you can change these initialization values while performing an analysis (within the analysis worksheet). The decline parameters and settings are as follows:
- Initial Best Fit — select either Autoforecast or Last X% of data points
- Autoforecast — (default setting) an automatic rigorous fit of an Arps’ decline. This initial best fit identifies the partition to fit to, and excludes outliers before fitting the data.
- Last X% of data points — uses the last-specified percentage of the data to initialize the analyses.
- Plot Defaults | Show results line — displays / hides a green-dashed line at:
i.) the final segment abandonment rate
ii.) the point where a segment transitions from hyperbolic to exponential (if applicable). - b Value Range — sets the minimum and maximum b value used in the forecast distribution used to determine percentiles. Harmony Enterprise accepts any value between 0 and 5.
- dlim (Minimum / Limiting Decline Rate) — defines a limiting effective decline rate, and every decline switches to an exponential decline (b=0) when this value is reached. This parameter can be toggled from dlim Hyp to dlim Exp. When the decline is created, whichever of the two parameters displayed is the default dlim type is displayed in the Analysis Parameters pane.
- Percentiles — add and remove percentiles to change which forecasts are created with the probabilistic decline. When a row is selected, you can click the percentile value or analysis name to modify them. The table must have at least two percentiles, and the Remove button is disabled when there are only two rows in the table.
- Default Calc Method — defines the Calculation Method to be used for the initialization of a decline. The options in the drop-down list depend on whether there is a value for the dlim Hyp or dlim Exp. When there is a value in either of these fields, the drop-down list only contains calculation methods that use dlim. When there are no values in either of these fields, all the calculation methods (including those with dlim) are displayed in the drop-down list.
- Abandonment Criteria — defines the abandonment rates (qf) for different fluids, or the duration of the decline (Δt) as abandonment criteria.
Multi Segment Decline
You can set the parameters that initialize all multi-segment decline analyses in Harmony Enterprise, and you can change these initialization values while performing the analysis, within the analysis worksheet. The multi-segment decline parameters and settings are as follows:
Gas Defaults
Segment #1:
- b value — select your b type for the first segment from the drop-down list: Best Fit, Input, or Custom.
- Input — enter your b value between 0 and 5 inclusively.
- Best Fit — Harmony Enterprise performs a curve-fitting to the selected historical portion of the data and reports a b value.
- Custom — if you have already created a custom attribute for b values, you can select Custom from the b drop-down list. (The custom attribute must be without units.)
- Constraints — you can define up to four constraints for the first segment. Harmony Enterprise needs at least one constraint within this section. If you define multiple constraints, the first constraint that is chronologically encountered, is the constraint that is applied.
- You can select your Δtmax to be an Input or Custom value from the drop-down list. A default value of 12 months is used. If you select a custom attribute for your Δtmax, make sure that the attribute has a unit of time. All attributes that have a time unit are displayed in the Custom drop-down list.
- You can also set your constraints to be a minimum production rate (qmin), minimum effective decline rate (dmin), and/or maximum incremental cumulative production (ΔQmax).
Segment #2:
- b value — you can define b-value settings for the second segment, similar to Segment #1 (see above).
- dlim Exp — click this button to toggle between exponential dlim and hyperbolic dlim. For more information, see dlim decline options. If there is no value in the dlim, exp field, a limiting decline calculation is not performed on the second segment. If you toggle this option, any values you enter are saved, and the current selection is what is used.
Liquid Defaults
See the Gas Defaults section above.
Best-Fit criteria
For your first segment, you can select to start at either:
- from initial peak rate (default setting) — equivalent to the highest rate that the entity has produced throughout its entire history.
- from initial production — the first production data point for that entity.
Typewell
These settings apply to the average rate, P90 rate, P50 rate, P10 rate, and the number of producing wells. For additional information, see the typewell analysis.
- All Rates — includes all wells in your rate calculations
- Producing Rates Only — only includes producing wells in your calculations
Material Balance
These options affect the behavior of material balance analyses:
- Show abandonment line — shows / hides the abandonment line on your plot.
- Abandonment Pressure — sets which “Abd Calc” method (in the Analysis Parameters view of the Analysis tab) is used by default when an analysis is created.
Water Oil Ratio
You can set the parameters that initialize water-oil ratio (WOR) analyses in Harmony Enterprise. These inputs can be overridden with each analysis, and the Options dialog box inputs are only used when the analysis is created. The WOR parameters and settings are as follows:
- Show results line — shows / hides the green-dashed line for abandonment on your plot.
- WOR — sets the abandonment WOR. Harmony Enterprise uses 49 bbl/stb as the default.
- WC — sets the abandonment water cut (WC). Harmony Enterprise uses 98% as the default.
- Initial Best Fit — specifies the percentage of your historical data that you want to be included in the initial best fit.
Reservoir
URM
Display Pseudo-Time Option — if selected, the Use Corrected Pseudo-Time checkbox is shown in the Unconventional Reservoir pane. The default setting is to hide this option.
Numerical
Gridding Parameter Defaults
Type your default gridding parameters for new analyses. For a detailed explanation of each of the parameters, see adjusting gridding.
If you want to revert to the original parameters, click the Reset to Default button at the bottom.
Wellhead Forecast
In some cases, wellhead forecasts have unstable results: well shut-ins and re-opens multiple times. Click the Apply TPC Curve Stabilization checkbox to switch to sandface forecasts during these unstable periods. For more information, see TPC stabilization.
Conventional Multi-well
Type your default gridding parameters for new analyses. For a detailed explanation of each of the parameters, see gridding parameters.
If you want to revert to the original parameters, click the Reset to Default button at the bottom.
Unconventional Multi-well
Type your default gridding parameters for new analyses. For a detailed explanation of each of the parameters, see gridding parameters.
If you want to revert to the original parameters, click the Reset to Default button at the bottom.
Probabilistic
Set your maximum number of threads for processing probabilistic analyses.
Optimize
Type your default setting for an erosion constant, and select your default H2S release rate. For more information, see Optimize analysis types.
Wellbore
Select either Configuration Name or Configuration Data for the default setting in the Wellbore editor and Optimize worksheets.
For information on importing and updating wellbore information, see Importing | Updating wellbore.
Auto Refresh Results
Set up your automated scheduled recalculations for FMB and URM analyses by selecting from the list of Custom Groups. For detailed instructions, see scheduling auto refresh results.
Unit Customization
For each of the attributes and properties listed in the main pane, you can set default units by selecting from the drop-down lists.
To import customized units in a .cu file, click the Import button.
To export customized units, click the Export button.
If you want to revert back to the original default settings, click the Reset button.
Error Display and Handling
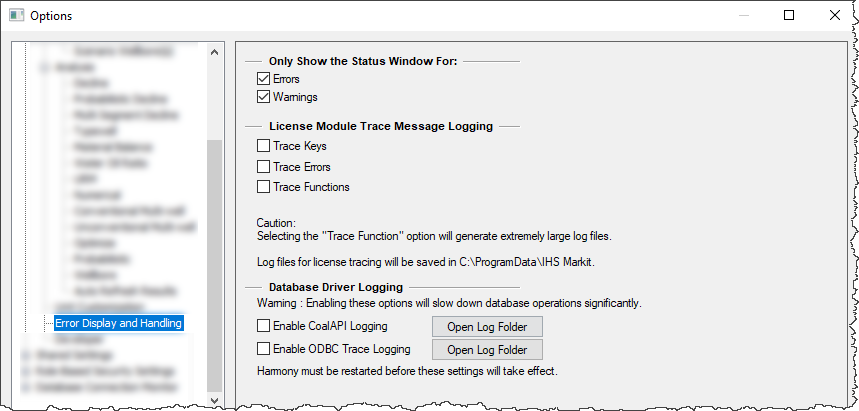
Only Show the Status Window For — click the checkboxes to show or hide error messages and warnings in the Status Window. By default, errors and warnings are displayed in the Status Window.
License Module Trace Message Logging — to enable logging for the license module, click the options you want. Note that these trace log files are extremely large. The log file directory is C:\ProgramData\IHS Markit.
Database Driver Logging — if you are importing data from a source database and receiving error messages related to that connection, or failure messages from the source database, you can enable database driver logging to capture detailed information to help find a solution. Your database administrator (DBA) can use these logs to isolate the issue and work on a solution. Database drivers are created and set up in the Microsoft ODBC Data Source Administrator, and often require elevated permissions, credentials, schema or views, and proprietary server and port information. Database driver logging provides information specific to your source database and connection, which could potentially include confidential or proprietary information.
You must restart Harmony Enterprise before CoalAPI and/or ODBC Trace logging changes take effect. Due to the nature of these logs, performance related to database operations slows down significantly, including imports. We recommend disabling these logs when you finish troubleshooting.
- CoalAPI Logging — uses a registry-based setting on the host computer, which is then used to trace events related to database connections. If you are importing from a source database and receiving error messages that cannot be interpreted, click the checkbox to enable this feature. Then, restart Harmony Enterprise and try connecting to the source database again. A log file is created in the listed directory.
Important: After generating the CoalAPI Trace log, disable this feature and restart Harmony Enterprise to prevent slow performance. We recommend providing your DBA with the log files for assistance. - ODBC Trace Logging — uses the Microsoft ODBC Data Source Administrator Tracing tool. If you are importing from a source database and receiving error messages, click the checkbox to enable this feature. Then, restart Harmony Enterprise and try connecting to the source database again. A log file is created in the listed directory. Note that ODBC trace logs may be several megabytes in size, and Notepad may not be able to open them. Alternatives include Notepad++, Visual Studio, or SQL Server Management Studio.
Important: After generating the ODBC Trace log, disable this feature and restart Harmony Enterprise to prevent slow performance. We recommend providing your DBA with the log files for assistance.
Important: The log files generated from CoalAPI and ODBC trace logging may contain proprietary information (for example, server names, well or analysis information. etc.). We recommend you consider the content of these files before sharing with others.
Shared Settings
These settings are database settings that apply to all entities.
General
Display Name Format — set your display name format (that is, DLS, NTS, API, Name, Number, Alias, Propnum, or External Well Key) from the drop-down list for all new wells (imported or added manually).
Calculations
Gas Conversion to BOE — barrel of oil equivalent (BOE) = oil volume + gas volume / factor. This factor can be changed from the default value of six, but the factor must be greater than one.
Classified Consolidations — select this option to include fluid produced from all wells, if you want to consolidate classified and unclassified decline analyses at the group level for EUR and fluid-produced calculations. The default setting only includes classified decline analyses. After you click OK, all consolidations are adjusted, which may take several minutes.
Production Editor Injection Sandface Calculations — select this option to enable injection rates when performing sandface pressure calculations in the Production editor. For more information, see injection calculations. By default, this option is deselected. This default setting ignores injection rates, and thereby uses the same logic as legacy versions of Harmony Enterprise.
Analytics Explorer — forecasts are stored as monthly increments for export to Analytics Explorer. Decline analyses and ratio trends can be saved as daily data for the start of forecast by setting a number of months to be converted to daily. Because of the large amount of data and performance impacts on the export, this is limited to a maximum of 12 months. The option is used the next time decline analyses are saved. The Refresh option in the Entity Viewer's context menu can be used to update selected wells. For more information, see context menu.
Role-Based Security Settings
These options apply to role-based security. If any of these settings are grayed-out, you do not have permission to make changes in this area.
Enable / Disable
Role-based security checkbox — by clicking this checkbox, you can assign permissions to other users for certain Harmony Enterprise tasks. In order for any changes to take effect, you need to close Harmony Enterprise and re-open it.
Role Definitions
The Superuser and Default roles are always available and cannot be edited nor deleted.
Roles:
- Add — clicking this button creates a new role (by default, Role 1, Role 2, and so on). You can rename a role (excluding the Superuser and Default roles) by clicking the role and typing a new name.
- Remove — after selecting a role and clicking this button, the role is deleted from the Roles pane.
Note: These buttons are only accessible to Superusers and users that have permission to manage security.
Permissions:
- Manage Security — if you select this option, the role selected in the Roles pane can edit permissions for other users (excluding the Superuser and Default users).
- Import / Update Wells — if you select this option, the role selected in the Roles pane can import and update wells.
- Delete Wells — if you select this option, the role selected in the Roles pane can delete wells in the Entity Viewer - Hierarchy pane, and scenarios can be deleted even when that permission is not explicitly selected.
- Delete Scenarios — if you select this option, the role selected in the Roles pane can delete scenarios under wells in the Entity Viewer – Hierarchy pane without requiring permission to delete wells.
- Modify Editors — if you select this option, the role selected in the Roles pane can change data in the Editors (that is, Properties, Wellbore, Production, Static Pressure). Note that when Modify Editors is not granted and Import / Update wells is granted, only the Database Connection is available for import. Also note that you are still able to change data in the Editors on a scenario without having this permission. However, you are not able to promote a scenario to become the parent well.
- Modify Existing Database Connections — if you select this option, the role selected in the Roles pane can change the mapping and other settings of an existing Database Connection used for imports.
- Extract to HLDB — if you select this option, the role selected in the Roles pane can extract wells, scenarios, and groups to an .hldb file.
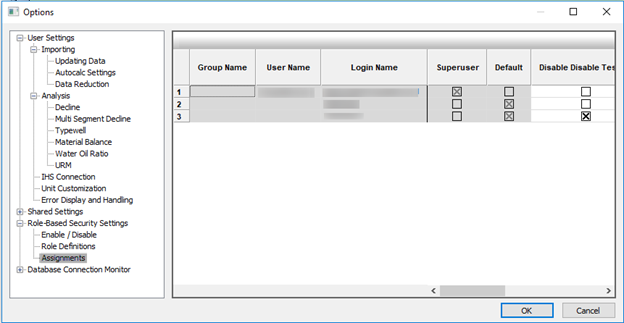
Assignments
You can assign roles to various users by clicking the appropriate checkboxes in the table.
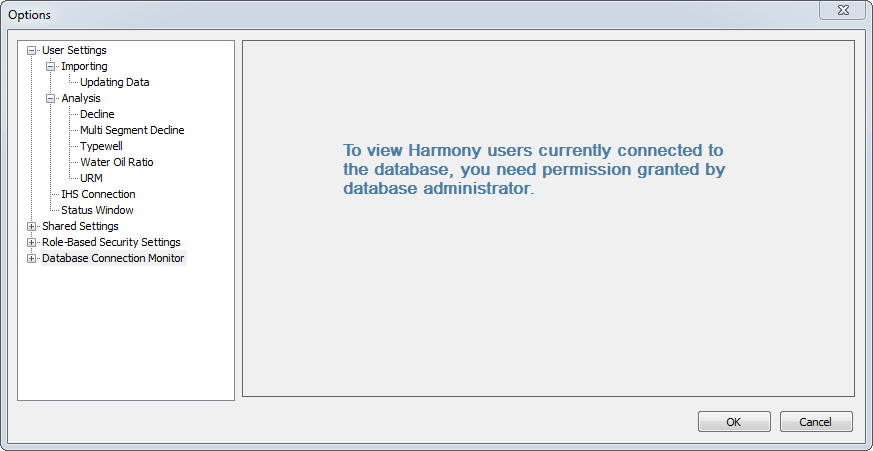
Database Connection Monitor
This table displays all the currently connected users to Harmony Enterprise.
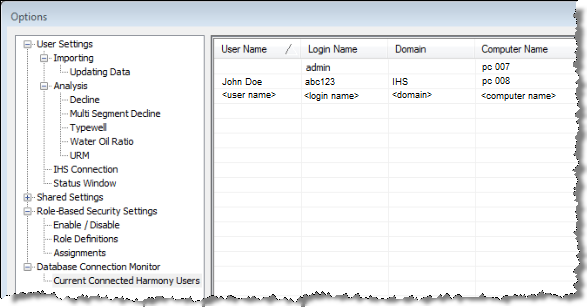
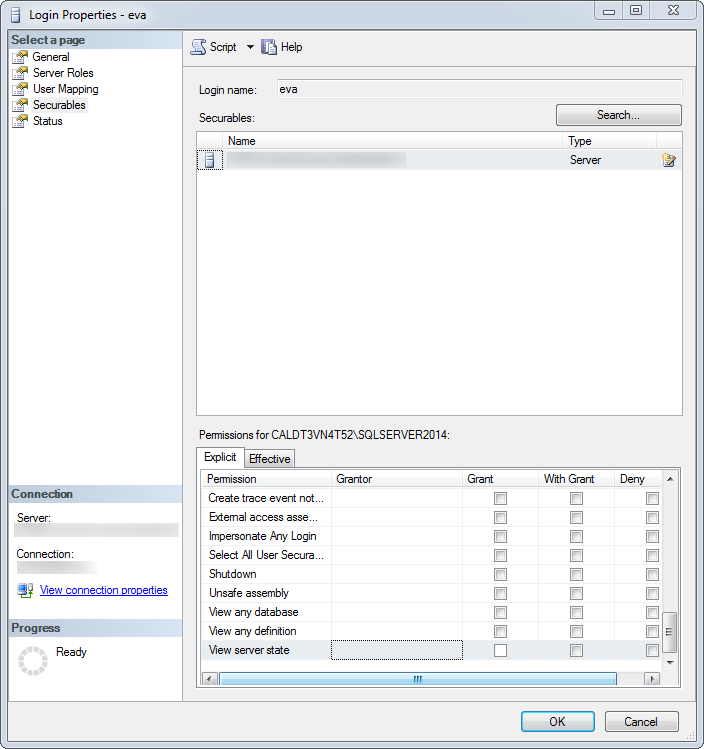
If the View server state checkbox is deselected in SQL Server Management Server, you are not able to see this content. If this is an issue, contact your database administrator. For more information, see active directory.