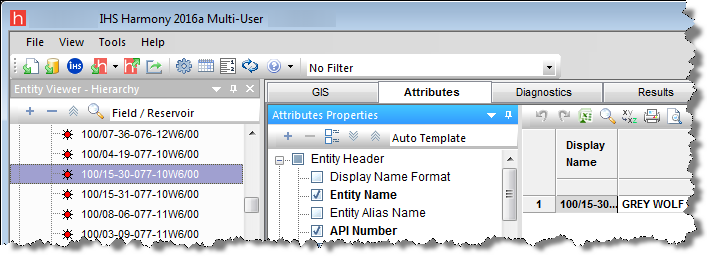
Attributes tab
The Attributes tab displays well information in a
table. Harmony displays a default selection of attributes (named Auto Template) when one or more wells are selected in the Entity Viewer.
You
can export this table to a .csv file. Some of the information displayed (for example, Reservoir or Operator name)
is not required to perform a well analysis, but can be helpful for filtering
data.
- The Attributes Properties tree structure to the left of the table lists all
of the available well attributes. When you select an item in the Attributes
Properties list, it is displayed in the table as a column heading. (Deselecting
an attribute removes it from the table.)
- Columns added to the table are
appended to the far right in the order in which they are selected. However,
you can click-and-drag columns to change this order, or add a new column. You can also click-and-drag a column off of the table if you do not want that column displayed.
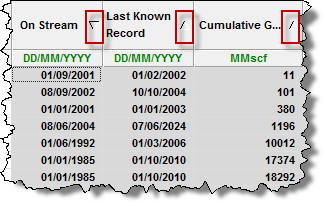
- Clicking a column header
sorts the table data by its attribute value, according to the same sorting rules as MS Excel.
- If you click a column header, and then press the Ctrl key, you can sort multiple columns at the same time. This is indicated by a sorting arrow in each of the columns. The columns are sorted in the order you click the header.
-
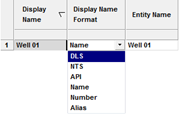
- The first pre-defined attribute column is the Display Name. You can define the format of this column in the Display Name Format column. After the display name is set, that name format is used in every module and worksheet in Harmony.
-
Well attribute data can be imported
from a file / database, entered manually, or copied-and-pasted from another
table cell. The table cell's color can be used to identify the method by which data can
be entered into the cell:
- Gray — read-only. These cells display
data from another location in Harmony, or these cells indicate that it is a calculated cell (for example, a custom attribute). Data in these cells cannot
be modified.
- White (no
drop-down list) — you can enter a
value, or paste content from another cell.
- White (with
a drop-down list) — you can select a
value from the drop-down list, or you can paste a value from the
drop-down list into these cells.
Toolbars
The Attributes tab has two toolbars: primary and secondary. The unique items are described below; for a description of common icons, see toolbars.
Primary toolbar
The primary toolbar is located below the Attributes Properties pane.
Clicking the  icon on this toolbar lists two options.
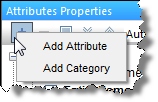
1. Add Attribute — opens the Create Custom Attribute dialog box. You can create two different types of custom attributes: Input (using values you enter), and Calculated (using equations you enter).
2. Add Category — opens the Create Custom Category dialog box where you can create custom categories to group your attributes. The selection tree updates after you add your category.
Other notes on this toolbar include the following:
- You can click the
 icon after selecting the custom attribute or category you want to delete. You are prompted to confirm your decision when deleting a custom attribute, but a custom category is immediately deleted.
- After you have customized the table / grid display to your liking (for example, showing or hiding attribute properties and re-ordering the category headers), you can save your configuration as a template for re-use. Click the drop-down arrow on the toolbar and select Save / Delete Template. To load a previously saved template, select it from the drop-down list.
- To return to Harmony's default template, select AutoTemplate.
-
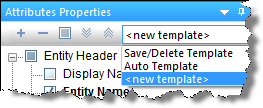
Note: Templates are user- and computer-specific; they are not database-specific.
Secondary toolbar
The secondary toolbar is located above the attributes table / grid and has the following important items:
-
 Undo / Redo — undo your previous action, or redo your action.
-
 Find / Replace — type the text you want to search for, and then type the text you want to use instead.
Context menus
Right-clicking the top left of your table lists these options:
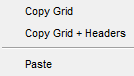
- Copy Grid — copies the table to the clipboard.
- Copy Grid + Headers — copies the table and table headers to the clipboard.
Right-clicking the numeric columns’ headers (the columns displaying units in green text) lists these options:
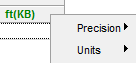
- Precision — select between decimal, scientific, or engineering.
- Units — select the units you want to display from the submenu.
After selecting your rows using the row headers, right-clicking the row numbers to the left and selecting Select Subset removes the other rows in the table, and this selection persists across Harmony (for example, the Entity Viewer, GIS map, and so on).
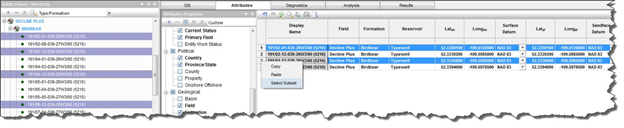
Right-clicking a white table cell lists these options: cut, copy, paste, and clear.
Custom attributes
You can create custom attributes in Harmony.
- When you click the (Add Custom Attribute / Category) icon on the Attributes Properties toolbar and select Add Attribute, the Create Custom Attribute dialog box opens.
- Your custom attribute is displayed in the Attributes Properties pane, under the category you have selected.
- You can remove a custom attribute by selecting it and clicking the (Remove Custom Attribute / Category) icon in the Attributes Properties toolbar.
- You can rename or edit your custom attribute's formula, by right-clicking it and selecting Rename or Edit Formula.
Custom-calculated numeric attributes
If you selected Number for your Unit Type in the Create Custom Attribute dialog box, you created a custom-calculated numeric attribute.
Clicking the Edit Formula button in this dialog box opens the Equation Editor, where you can use a combination of existing production datasets, custom-input datasets, custom-calculated datasets, well attributes, custom-input attributes, custom-calculated attributes, constants, and mathematical operators to build your equation. For more information, see the Equation Editor dialog box.
Custom-calculated text attributes
You can add a custom-calculated text attribute using a combination of existing text attributes, custom-text attributes, custom-calculated text attributes, and user-defined text.
When you click the (Add Custom Attribute / Category) icon and select Add Attribute, the Create Custom Attribute dialog box opens.
- When you select Text from the Attribute Style drop-down list and Calculated for the Type of Attribute, the Equation Editor opens.
-
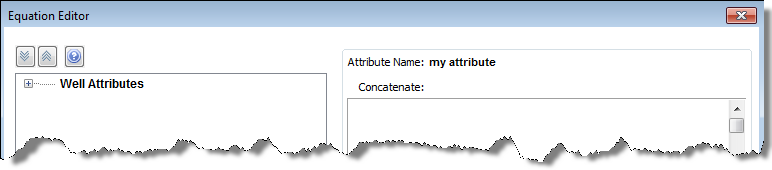
- You can type in the Concatenate pane, or you can select the attributes you want from the tree structure; then click OK.
The top part of the Equation Editor has the following components:
- Tree structure — displays an updated list of all the text attributes that are available for concatenation. This includes existing text attributes, custom-input text attributes, and custom-calculated text attributes. Clicking an item in the tree structure inserts it into the formula.
- Concatenate pane — displays the text attributes and user-defined text for concatenation (links items together).
IHS Harmony™ 2016b Multi-User | Last revised: October 19, 2016
Copyright © 2016 IHS Inc.