Options dialog box
You can access the Options dialog box from the Tools menu, or by clicking the Options icon ( ) on the main toolbar. Any of the User Settings you change apply after you close the dialog box and do not affect existing analyses. However, Shared Settings are database settings that apply to all entities, both new and old.
Importing
Unreported Volume or Rate
- Leave as Null (empty) — assigns no value to volumes / rates whose true value is not reported.
- Zero — assigns a value of "0" to volumes / rates whose true value is not reported.
- Step Interpolate — carries over the preceding value to an unreported volume. This creates a step-like plot.
- Linearly Interpolate — assigns a value to an unreported volume that is equidistant from the preceding and following reported values. This creates a linear plot.
Updating data
Production Data
- Do not overwrite existing data — does not overwrite data, but imports new production data.
- Overwrite / Merge existing data — imports all new production data and overwrites data with the same dates as those being imported.
- If an analysis ID or worksheet ID matches an existing well's analysis ID or worksheet ID, this data is not imported.
- Append from last production date — imports only the production data from the last production end date.
Attributes and Properties
- Update new attribute data — updates null attributes only.
- Update new and existing attribute data — updates null attributes and overwrites existing attributes with new data.
- Note that if a well is imported that has its data merged, the display name format is retained.
- Discard all incoming attribute data — does not import attribute data.
Analysis Data
These settings only apply when you import well data from a database.
- Append incoming analyses — adds all analyses, even if analyses with the same name exist in the project. If duplicate analyses / worksheets exist, the analysis / worksheet names are appended with a number.
- Discard incoming analyses — does not import analyses.
Wellbore
- Overwrite with incoming wellbore data
- For IHS Enerdeq / IHDC imports:
- Only writes to the deviation survey, if it is empty (that is, when the wellbore configurations are empty).
- Discard incoming wellbore data — ignores all wellbore data being imported.
Imported Well Linking
Analysis
Click the Worksheet Creation checkbox to select or deselect adding the Add Analysis menu to a new worksheet.
Decline
These options set the initialization of new decline analyses and constrain the use of best-fit tools:
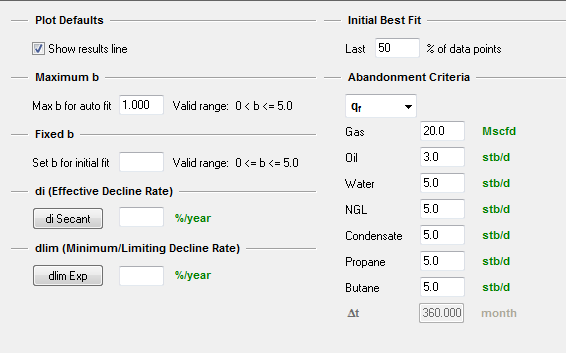
You can set the parameters that initialize all decline analyses in Harmony, and you can change these initialization values while performing an analysis (within the analysis worksheet). The decline parameters and settings are as follows:
- Show results line — displays / hides a green-dashed line for abandonment rates on your decline plot.
- Maximum b value — sets the maximum b value allowed for the best-fit decline. Harmony accepts any value between 0 and 5.
- Fixed b — if a value is defined, every decline initializes with this b value, and the yellow lock icon defaults to a locked (
 ) position. Harmony accepts any value between 0 and 5.
- di — sets an initial effective decline rate for the start date of a segment, and every decline curve initializes with this value. This parameter can be toggled to ai (initial nominal decline rate), di tan, and di sec.
- dlim — defines a limiting effective decline rate, and every decline switches to an exponential decline (b=0) when this value is reached.
- Initial Best Fit — specifies the percentage of your historical data that you want be included in the best-fit portion of your decline.
- Abandonment Criteria — defines the abandonment rates (qf) for different fluids, or the duration of the decline (Δt) as abandonment criteria.
Multi-segment decline
You can set the parameters that initialize all multi-segment decline analyses in Harmony, and you can change these initialization values while performing the analysis, within the analysis worksheet. The multi-segment decline parameters and settings are as follows:
Gas defaults
Segment #1:
- b value — select your b type for the first segment from the drop-down list: Best Fit, Input, or Custom.
- Input — enter your b value between 0 and 5 inclusively.
- Best Fit — Harmony performs a curve-fitting to the selected historical portion of the data and reports a b value.
- Custom — if you have already created a custom attribute for b values, you can select Custom from the b drop-down list. (The custom attribute must be without units.)
- Constraints — you can define up to four constraints for the first segment. Harmony needs at least one constraint within this section. If you define multiple constraints, the first constraint that is chronologically encountered, is the constraint that is applied.
- You can select your Δtmax to be an Input or Custom value from the drop-down list. A default value of 12 months is used. If you select a custom attribute for your Δtmax, make sure that the attribute has a unit of time. All attributes that have a time unit are displayed in the Custom drop-down list.
- You can also set your constraints to be a minimum production rate (qmin), minimum effective decline rate (dmin), and/or maximum incremental cumulative production (ΔQmax).
Segment #2:
- b value — you can define b-value settings for the second segment, similar to Segment #1 (see above).
- dlim Exp — click this button to toggle between exponential dlim and hyperbolic dlim. For more information, see dlim decline options. If there is no value in the dlim, exp field, a limiting decline calculation is not performed on the second segment. If you toggle this option, any values you enter are saved, and the current selection is what is used.
Liquid defaults
See the Gas Defaults above.
Best-fit criteria
For your first segment, you can select to start at either:
- from initial peak rate (default setting) — equivalent to the highest rate that the entity has produced throughout its entire history.
- from initial production — the first production data point for that entity.
Typewell
These settings apply to the average rate, P90 rate, P50 rate, P10 rate, and the number of producing wells. For additional information, see the typewell analysis.
- All Rates — includes all wells in your rate calculations
- Producing Rates Only — only includes producing wells in your calculations
Water oil ratio
You can set the parameters that initialize WOR analyses in Harmony. These inputs can be overridden with each analysis, and the Options dialog box inputs are only used when the analysis is created. The WOR parameters and settings are as follows:
- Show results line — shows / hides the green-dashed line for abandonment on your plot.
- WOR — sets the abandonment WOR. Harmony uses 49 bbl/stb as the default.
- WC — sets the abandonment water cut (WC). Harmony uses 98% as the default.
- Initial Best Fit — specifies the percentage of your historical data that you want to be included in the initial best fit.
URM
Display Pseudo-Time Option — if selected, the Use Corrected Pseudo-Time checkbox is shown in the Unconventional Reservoir pane. The default setting is to not display this option.
IHS connection
These options determine the behavior of the direct connection to IHS.
- Save Login Information — saves
your username and password, so you can log into IHS without manually
entering your login credentials.
- Split Enerdeq Wells by Production ID — when importing wells, you can separate wells based on production ID. For example, this may apply when you are importing US data where the production IDs have changed throughout the life of a well. In Harmony, there is one well per API, and production history from individual production IDs are aggregated together to make sure that the whole production history is captured.
- Save Login Information — saves your login information, so you can log in quicker.
Status window
Click the checkboxes to show or hide error messages and warnings in the status window.
Production calculations (shared setting)
Gas conversion to BOE: The barrel of oil equivalent (BOE) = oil volume + gas volume / factor. This factor can be changed from the default value of six, but the factor must be greater than one.
Role-based security settings
These options apply to role-based security. If any of these settings are grayed-out, you do not have permission to make changes in this area.
Enable disable
Role-based security checkbox — by clicking this checkbox, you can assign permissions to other users for certain Harmony tasks. Note that any changes you make to this node require Harmony to be closed and re-opened in order for the changes to take effect.
Role definitions
The Superuser and Default roles are always available and cannot be edited nor deleted.
- Add — clicking this button creates a new role (by default, Role 1, Role 2, and so on). You can rename a role (excluding the Superuser and Default roles) by clicking the role and typing a new name.
- Remove — after selecting a role and clicking this button, the role is deleted from the Roles pane.
Permissions:
- Edit Role-Based Security — if you select this option, the role selected in the Roles pane can edit permissions for other users (excluding the Superuser and Default users).
- Import Wells / IHS Update — if you select this option, the role selected in the Roles pane can import wells and update from IHS Enerdeq or IHDC (for example, by clicking the first four icons on the main toolbar).
- Delete Wells — if you select this option, the role selected in the Roles pane can delete wells in the Entity Viewer - Hierarchy pane.
Assignments
At this node, you can assign roles to various users by clicking the appropriate checkboxes in the table.
IHS Harmony™ 2016b Multi-User | Last revised: October 19, 2016
Copyright © 2016 IHS Inc.
