Calculating Zones
Thickness Calculator ( ) – instant calculation and log display of zones meeting your log cut-off criteria within your selected interval. Work with calculations using either Manual or Automatic mode.
Manual Mode
Click the Thickness Calculator () and the function is active in Manual Mode. In this mode, determine the thickness of specific intervals.
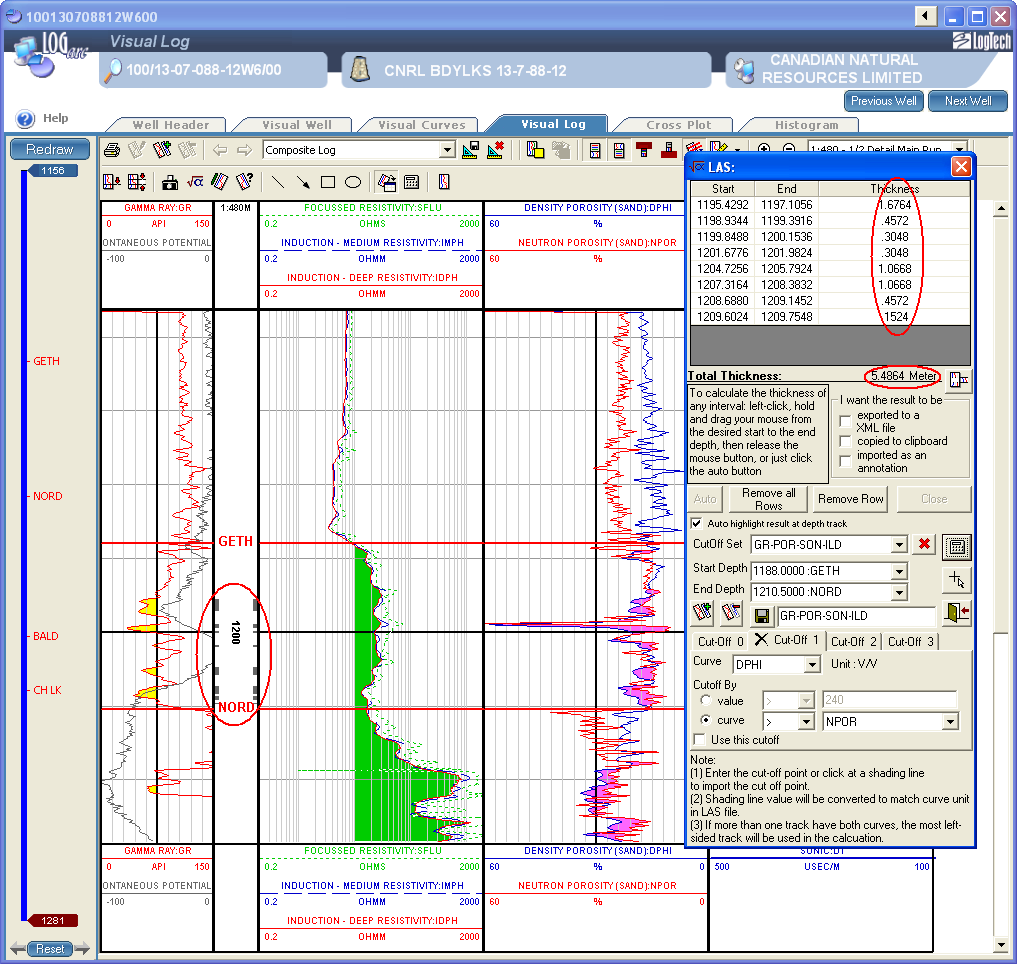
With the Thickness calculator screen displayed, place the cursor at the top of an interval, and then drag to the base of the interval. The thickness of the interval covered (Start and End Depth and thickness) appears in the calculator window and the Total Thickness appears at the bottom of the window. Select additional intervals if desired. With each additional interval selected, the Total Thickness will be recalculated.
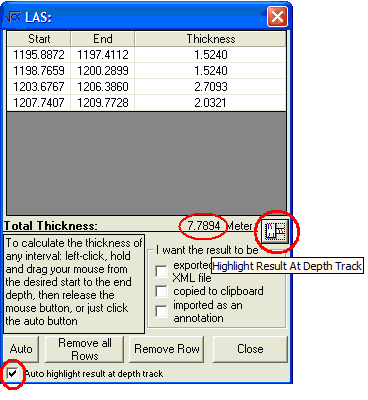
To highlight the selected intervals in the Depth track, click the Highlight Results at Depth Track ( ) button to the right of the Total Thickness value, or select the check box to the left of Auto highlight result at Depth Track at the bottom of the screen.
To revise the thickness calculation value, remove one or more of the intervals used in the calculation. In the interval display window, click the row to delete, then click the Remove Row button at the bottom of the screen. To perform a new calculation, click the Remove all Rows button and reselect your intervals.
Output Thickness Values - output the thickness calculations for use elsewhere in one of the following methods when you close the Thickness Calculator:
- Export as XML file - a Windows Explorer screen will prompt you for a location to store the file.
- Copied to Clipboard - you may then paste the values to spreadsheet or other application
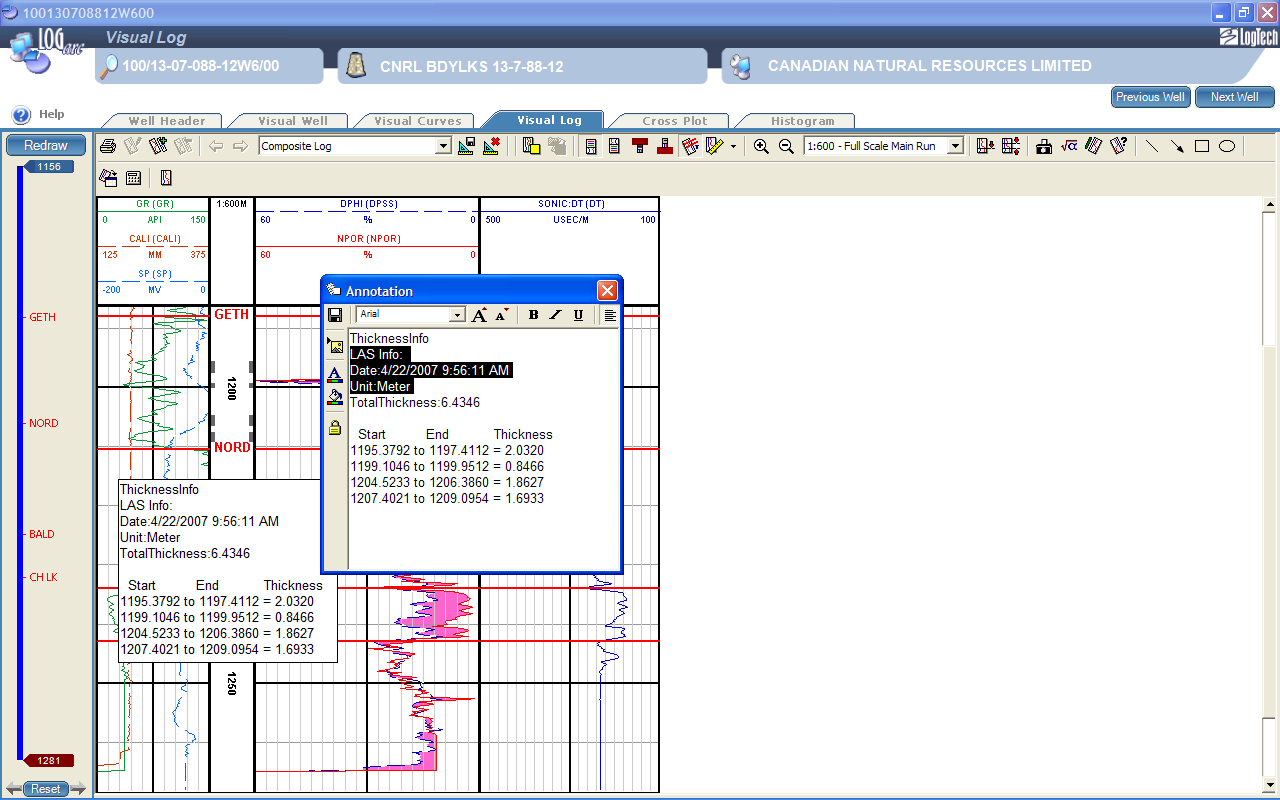
- Import as an annotation - an annotation box with the Thickness Calculation values will appear on the log display. You may resize the annotation box by clicking and dragging at a side or corner.
To move the box, click the box, hold the mouse key down and drag the box to the desired location.
To edit the data in the box, double-click the box, perform the edits, then click the Save and Close button in the top left corner of the Annotation window.
To delete the thickness annotation, right-click on the annotation and click Delete at the bottom of the menu.
Clear Interval Highlights in Depth Track - the interval highlights are retained in the Depth track as part of the current log display for output as required. To clear the displayed intervals for a new calculation, once you have click the Remove all Rows button, or closed and reopened the Thickness Calculator, click the Highlight Results at Depth Track button. When you reopen the Thickness Calculator function, if the Auto highlight result at Depth Track is checked , then the highlighted intervals in the Depth track will automatically clear when you select the first interval
Automatic Mode
In Automatic Mode, the Thickness Calculator allows you to set one or more (over one hundred) cut-off criteria, based on log curve values, to automatically calculate intervals and thicknesses over a user-specified depth interval.
To activate the Thickness Calculator in Automatic mode
- Click the Thickness Calculator (
 ) button.
The Thickness Calculator dialog box appears.
- Click the AUTO button at the bottom-left corner of the Thickness Calculator dialog box.
The dialog box extends to display the Auto functions.
In Auto mode, the Thickness Calculator uses one of a set of saved Cut-off templates for you to select to perform the calculations. A default set is delivered with the software. Alter and edit these templates, saving as you wish, to create your desired cut-offs criteria.
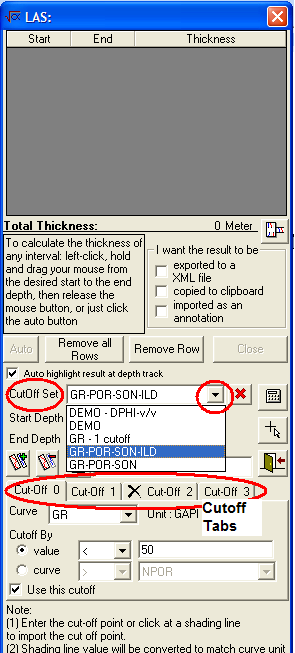
In the CutOff Set box, click the drop-down arrow to access and select the desired Cutoff Template. The Cut-off tabs, displayed below, list the cut-off criteria for the selected template. Click on each tab to view the current criteria.
To Edit Cut-off Criteria:
For each Cut-off tab, the cut-off criterion is based on either a curve-to-value relationship or a curve-to-curve relationship.
- From the Curve drop-down list, select the curve of interest. Notice that the units of the curve are displayed to the right of the curve window (this is particularly important when creating cutoffs for porosity curves or bulk density where the values vary greatly depending on the units).
- Click the radio button for either value or curve to define the criterion relationship.
- Click the relationship drop-down to select the type of relationship (>, =, <, etc).
- Set the value or select the curve from the drop-down to complete the relationship.
For curves that may a variety of units – porosity (decimal or %) or density (gm/cc or kg/m3) - check the curve units listed to the right of the curve before setting the cut-off value.
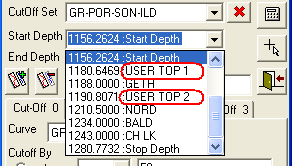
- Select an Interval – to specify an interval over which to perform the thickness calculation, input the desired Start Depth and End Depth on the provided windows. You may input a specific depth, or if tops are available on the well, you may select a top depth. If you have created your own top picks in Visual Log (details above), these will be displayed also, available for you to select.
- Run the Thickness Calculator.
Calculate ( ) - click to perform the thickness calculation.
- Output the Calculation Results - click the check the output format (described above under Manual mode), and click the Close (
 ) button.
To add or remove cut-off tabs to the template:
- Add a Cut-off (
 ) - add a new tab to the template, then define the cut-off criterion.
 - Remove a Cut-off (
 ) - click the tab of the cut-off to remove, then click the Remove Cut-off button.
 - Save a Cut-off set (
 ) that you have created or modified. Remember to rename the new cut-off set (in the name box next to this Save icon) or the original will be overwritten.


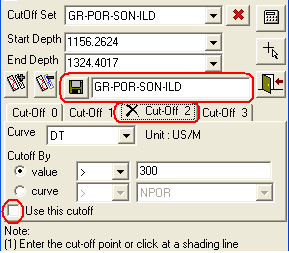
You may temporarily disable a specific cut-off within a cut-off set, rather than having to edit the Cut-off set. Click the cut-off tab of interest and then click on the check box next to Use this cutoff text at the bottom of the cut-off criteria to remove the check mark. A black X appears on the tab indicating that the cut-off is disabled. Click again in the check box to turn this cut-off back on.
Delete a Cut-off set ( ). Select from the drop-down list the Cut-off set that to delete, and then click the Delete button to the right of the Cut-off set list.
Manual ( ) - click this button to return to Manual mode of thickness calculation.
Close ( ) – to close the Thickness Calculator. If you checked one or more of the boxes to output the calculated results (XML, to clipboard, as annotation), these will be generated on close of the Thickness calculator.
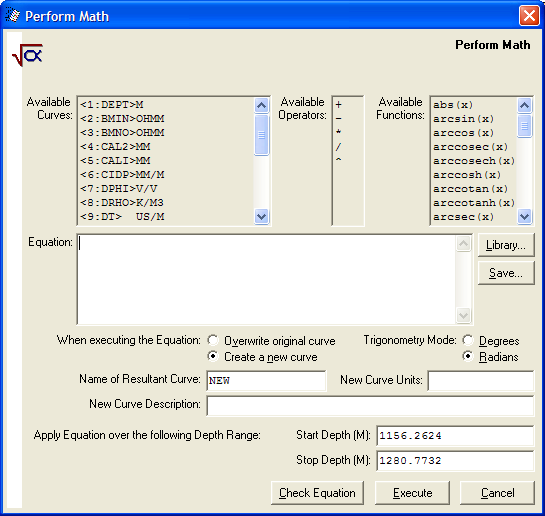
Perform Math ( ) – derive new curves by applying formulae to the existing curves (e.g. to generate a water saturation curve). Derived curves can be displayed and fully manipulated within the log display. Formulae are saved in a library for re-use.

Click the button to invoke the Perform Math dialog box.

IHS Markit™