
You can create projects from either AccuMap or the IHS Energy Information Hub. Both procedures appear below.
1. After you create a Detail Map in AccuMap, from the Detail Map menu, select Launch AccuX.
AccuMap only transfers the well data that appears in the current Detail Map. To change the data transferred, resize your Detail Map window.
The Axxses Connection Info dialog box appears.
2. In the Hub log using mode box, accept the default use digital log only. You can add wells without digital logs later.
If you're using only raster logs, select only use raster without digitizing.
3. Click OK.
When the online process is complete, an initial ELEVATION KB map appears and AccuX closes the online session. Proceed to Step 2: Examining the Map.
1. Double-click
AccuX ( ) on your PC desktop.
2. Select either Run Linked to AccuMap DB Mode to work with the entire Western Canadian Basin (limited only by your AccuMap data license), or select Run Project Mode to work with a smaller map area you define in step 6 below.
3. From the Global menu, select Global Online AXXSES Settings.
The Global Online Axxses Settings dialog box appears.
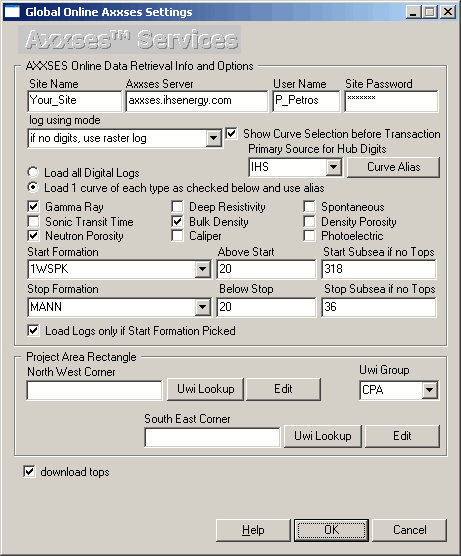
4. If you're a subscription client for digital log curves, clear the Show Curve Selection before Transaction checkbox for AccuX to operate most efficiently.
5. From the log using mode box, accept the default use digital log only. You can add wells without digital logs later.
6. If using Project mode complete the following bulleted steps:
 Click Edit.
The Unique Well Identifier
dialog box appears.

Create
a composite UWI string for the NW and SE corners of the area of interest. For example, to create T46R4W5 (township
46, range 4, west 5), select 1??????04604W5?? then click OK.
UWIs for DLS always start with 1, NTS with 2, and FPS with 3.
7. In the Global Online Axxses Settings dialog box, click OK.
8. From the Map menu, select Create map from AXXSES to download the data sets.
When the online process is complete, an initial ELEVATION KB map appears and AccuX closes the online session. Proceed to Step 2: Examining the Map.
