The Entity Viewer - Hierarchy displays the entities in a project, which you can view, sort, and select for analysis. Note that there is a well count at the bottom, which counts wells and scenarios (but not groups).
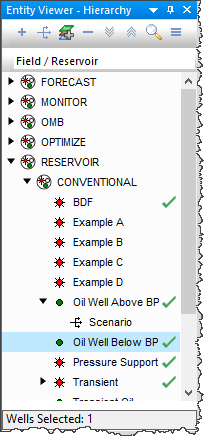
Clicking an entity in this pane highlights the entity in the GIS map and displays the entity's data under the other tabbed headings. (Only well and meter station entities are shown on the GIS map, and only if they have valid location information entered in their attributes.)
You can scroll through wells using your keyboard's arrow keys by doing the following: click the tab you want to view (for example, Analysis or Diagnostics), click a well in the Entity Viewer, and then press the Up and Down arrow keys on your keyboard.
You can select multiple entities by clicking wells while holding down the Ctrl key (to make individual selections), or the Shift key (to make bulk selections).
Toolbar
The Entity Viewer - Hierarchy has the following important icons:
-
 Add Well — opens a submenu where you can select your well type (for example, gas, oil, water, and so on).
 -
 Add Scenario — (for wells) adds a scenario child item below the parent well in the Entity Viewer - Hierarchy pane.
 -
 Add Layer — (for wells) adds a layer to the selected well.
 -
 Remove Selected Entities — select an entity / scenario in the hierarchy structure and then click this icon to remove it. This removes the entity from the database, so you are prompted to confirm your decision.
 - Any entities that you add or delete are reflected in the GIS, Diagnostics tab, analysis tab, Results tab, and Attributes tab. Deleting a well or group also removes it from the active filter.
-
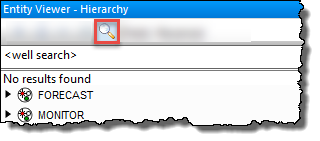
 Search — opens a search box where you can search for entities by name. (You can also initiate a search by pressing Ctrl + F.)
 -
-
 Contextual Commands — select from the Context menu options.
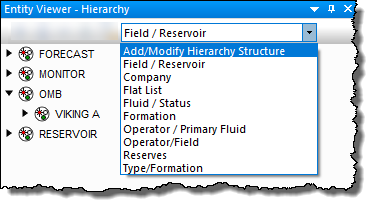
 - Hierarchy Structure — you can add a hierarchy structure, modify an existing hierarchy structure ,or select Field / Reservoir. If you select Add / Modify Hierarchy Structure, you can drag-and-drop fields from the Available Fields pane to the Current Hierarchy pane.
For a description of common icons, see pane toolbars.
Work status icons
The Entity Viewer panes can use icons to indicate the work status of entities. You can set your work status manually by right-clicking the entity and selecting Set Entity Work Status. To reset your work status, right-click and select Clear Status.
The icons are as follows:
 (Complete) — an analysis has been completed
for this entity.
(Complete) — an analysis has been completed
for this entity.
 (In Progress) — this entity has been selected,
and an analysis has been started, but it has not yet been completed.
(In Progress) — this entity has been selected,
and an analysis has been started, but it has not yet been completed.
 (Invalid) — data for this entity has changed, and any analyses are no longer be valid.
Hierarchy structure
The Hierarchy pane organizes entities in a hierarchical structure according to specific attributes, which you can view in the Attributes tab.
To initially view wells, Harmony Enterprise provides a default hierarchy structure: Field / Reservoir. To create a new hierarchy structure, select Add / Modify Hierarchy Structure from the drop-down list.
After creating additional hierarchy structures, you can select it from the drop-down list on top of the pane.
Context menu
Right-clicking within this pane lists various options, which depend on the type of entity you select (for example, a well, group, or multiple wells).
- Add Scenario — adds a scenario child item below the parent well in the Entity Viewer - Hierarchy pane.
- Duplicate Scenario — (for scenarios) copies your currently selected scenario.
- Promote to Well — (for scenarios) replaces the parent well with the selected scenario, and demotes the parent well to a scenario. You are prompted to confirm your decision.
- Rename — opens a dialog box where you can type a new name for your entity (well or scenario).
- Delete Selected Entities — you are prompted to confirm the deletion, which removes the entities from the database. Note that you are not able to delete an entity that is locked by another user. To see the latest list of entities, click the Refresh icon (
 ) on the main toolbar.
- Set Entity Work Status — changes the work status icon for the selected entity.
- Select Constituent Wells — (for groups): selects all of the wells that belong to the group.
- Expand Selected Group Only — (for groups): expands the selected group.
- Apply Workflow to Selected Entities — applies your workflow to the entities you selected. For more information, see apply a workflow.
- Refresh Results for URM and FMB — updates the FMB and URM results for the selected entities (wells, scenarios, or groups).
- Refresh Results for Optimize — updates the Gas IPR / TPC and Oil IPR / TPC results for the selected entities (wells, scenarios, or groups).
- Refresh results for Declines — updates the saved forecasts for decline analyses when the portion to be stored as daily is changed. For more information, see shared settings.
- Copy / Paste from Clipboard — copies / pastes data from the Properties editor.
- Go To — after selecting an entity, you can right-click it and select Go To, which highlights the entity on the GIS map with a blinking circle. If location information is not available for the well, a warning message is displayed in the Status Window.